ELK stack is a popular, open source log management platform. It is used as a centralized management for storing , analysing & viewing of logs. Centralized management makes it easier to study the logs & identify issues if any for any number of servers.
Basically ELK stack is a combination of three open source tools,
Elasticsearch is a NoSQL database that is used for storing the logs,
Logstash is a tool that acts as a pipeline that accepts the inputs from various sources i.e. it collects, parses & stores logs for future use,
& lastly we have Kibana which is a web interface that acts as a visualization layer, it is used to search & view the logs that have been indexed by logstash.
Also we will be using Filebeat, it will be installed on all the clients & will send the logs to logstash.
In this tutorial, we will learn to install ELK stack on RHEL/CentOS based machines. So let’s start with pre-requisites.
(Recommended Read: Install DRUPAL & create your own Website/Blog )
(Also Read: Installing Awstat for analyzing Apache logs )
Pre-requisite
The main dependency for installing the ELK stack is Java. Make sure that you have java 8 installed on the machine that will host ELK stack. Check the installed java version by executing the following command from terminal,
$ java –version
If you need to install java on the machine, please go through our detailed article on “How to install java on CentOS/RHEL”.
Install ELK stack
We will now start the installation of ELK stack by installing Elasticsearch first. For doing that we will add the official Elasticsearch repository on our server. Create a new repo by the name ‘elasticsearhc.repo’ in the folder ‘/etc/yum.repos.d’,
$ sudo vi /etc/yum.repos.d/elasticsearch.repo
& add the following content to the file,
[elasticsearch]
name=Elasticsearch repository
baseurl=http://packages.elastic.co/elasticsearch/2.x/centos
gpgcheck=1
gpgkey=http://packages.elastic.co/GPG-KEY-elasticsearch
enabled=1
Once the repo has been added, next we will add the gpg key for the elasticsearch repo. Execute the following command to install the key,
$ rpm --import https://packages.elastic.co/GPG-KEY-elasticsearch
We now have successfully setup the elasticsearch repo & can now install it using the following command,
$ sudo yum install elasticsearch
Next start the elasticsearch service & enable it for boot with the following commands,
$ systemctl start elasticsearch
$ systemctl enable elasticsearch
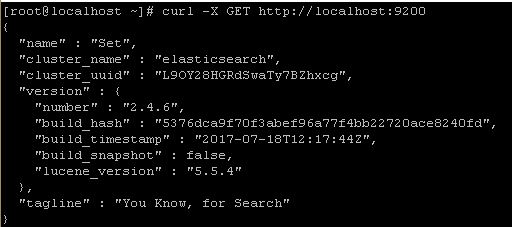
Now run the following command from the terminal to check if the elasticsearch is working properly,
$ curl -X GET http://localhost:9200
if your elasticsearch is working properly, you should get the following reply,

Next we will now install Logstash. Like we did with elasticsearch, we will first add the repository for logstash ,
$ sudo vi /etc/yum.repos.d/logstash.repo
[logstash]
name=Logstash
baseurl=http://packages.elasticsearch.org/logstash/2.2/centos
gpgcheck=1
gpgkey=http://packages.elasticsearch.org/GPG-KEY-elasticsearch
enabled=1
We don’t need to add the gpg-key for logstash as it uses the same key as elasticsearch. Now install logstash using yum,
$ sudo yum install logstash
Now is the turn to install Kibana on the machine. Start by creating a repo for kibana,
$ sudo vi /etc/yum.repos.d/kibana.repo
[kibana]
name=Kibana repository
baseurl=http://packages.elastic.co/kibana/4.5/centos
gpgcheck=1
gpgkey=http://packages.elastic.co/GPG-KEY-elasticsearch
enabled=1
It also uses the same gpg-key as elasticsearch. Now install kibana using yum,
$ sudo yum install kibana
After installation, start service & enable it at boot time
$ systemctl start kibana
$ systemctl enable kibana
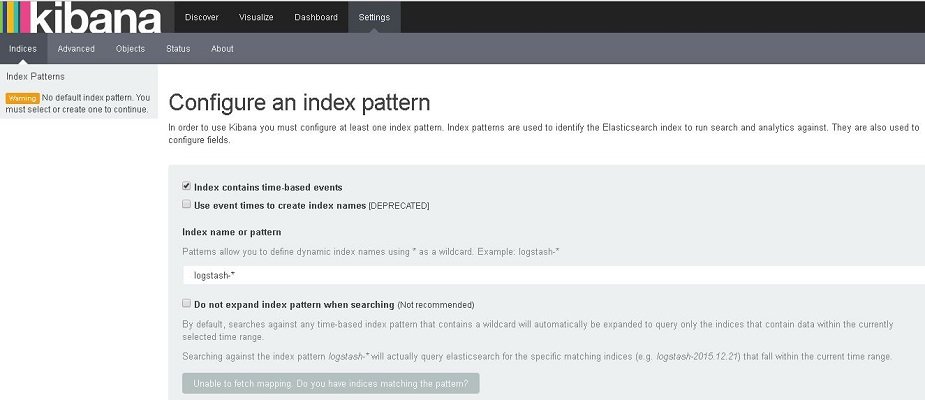
Kibana is now installed & working on our system. To check the web-page, open the web browser & go to the URL mentioned below (use the IP address for your ELK host)
http://IP-Address:5601/

We have successfully install ELK stack, we will now configure it so that it can analyse the logs.
Configure ELK stack
First thing after the installation, we need to create an SSL certificate. This certificate will be used for securing communication between logstash & filebeat clients. Before creating a SSL certificate, we will make an entry of our server IP address in openssl.cnf,
$ vi /etc/ssl/openssl.cnf
and look for section with ‘subjectAltName’ & add your server IP to it,
subjectAltName = IP:10.20.30.100
Now change the directory to /etc/ssl & create SSL certificate,
$ cd /etc/ssl
$ openssl req -x509 -days 365 -batch -nodes -newkey rsa:2048 -keyout logstash-forwarder.key -out logstash_frwrd.crt
Now copy the created SSL certificate to all the clients that have filebeat installed.
Configure Logstash
Now we will configure the logstash, we need to create a configuration file in the folder ‘/etc/logstash/conf.d’ . This file should be divided into three sections i.e. input, filter & output section.
The input section has configuration for logstash to listen on port 5044 for incoming logs & has location for ssl certificate,
‘filter section ’ will have configuration to parse the logs before sending them to elasticsearch,3
‘output section’ defines the location for the storage of logs.
$ vi /etc/logstash/conf.d/logstash.conf
# input section
input {
beats {
port => 5044
ssl => true
ssl_certificate => "/etc/ssl/logstash_frwrd.crt"
ssl_key => "/etc/ssl/logstash-forwarder.key"
congestion_threshold => "40"
}
}
# Filter section
filter {
if [type] == "syslog" {
grok {
match => { "message" => "%{SYSLOGLINE}" }
}
date {
match => [ "timestamp", "MMM d HH:mm:ss", "MMM dd HH:mm:ss" ]
}
}
}
# output section
output {
elasticsearch {
hosts => localhost
index => "%{[@metadata][beat]}-%{+YYYY.MM.dd}"
}
stdout {
codec => rubydebug
}
}
Now save the file & exit. Now start the logstash service & enable it at boot time,
$ systemctl start logstash
$ systemctl enable logstash
Configuring Clients
Now to be able to communicate with the ELK stack, Filebeat needs to installed on all the client machines. To install filebeat, we will first add the repo for it,
$ sudo vi /etc/yum.repos.d/filebeat.repo
[beats]
name=Elastic Beats Repository
baseurl=https://packages.elastic.co/beats/yum/el/$basearch
enabled=1
gpgkey=https://packages.elastic.co/GPG-KEY-elasticsearch
gpgcheck=1
Now install filebeat by running,
$ sudo yum install filebeat
After the filebeat has been installed, copy the ssl certificate from the ELK stack server to ‘/etc/ssl’. Next we will make changes to filebeat configuration file to connect the client to ELK server,
$ vi /etc/filebeat/filebeat.yml
Make the following changes to file,
. . .
paths:
- /var/log/*.log
. . .
. . .
document_type: syslog
. . .
. . .
output:
logstash:
hosts: ["10.20.30.100:5044"]
tls:
certificate_authorities: ["/etc/ssl/logstash_frwrd.crt"]
. . .
Now start the service & enable it at boot time,
$ systemctl restart filebeat
$ systemctl enable filebeat
We now have our ELK stack ready & communicating with the clients.
We now end this tutorial on how to install ELK stack on CentOS/RHEL. Please feel free to send in any questions/queries using the comment box below.
If you think we have helped you or just want to support us, please consider these :-
Connect to us: Facebook | Twitter | Google Plus
Donate us some of you hard earned money: [paypal-donation]
Linux TechLab is thankful for your continued support.

Hi,
Do we need to open the firewalls for the ports 9220,5601 and 5044.
Thanks,
Praveen Reddy
yes you need to open these ports in firewall.
Hi,I want FreeIPA server (https://www.freeipa.org/page/Main_Page ) logging with ELK stak but it isn’t setting.
Could you please help me,please?