As we know that every machine on a network has a IP address assigned to it, which is like a unique address of that machine in our network. In similar way, every website on internet has a IP address associated to it but we normally don’t use those IP addresses to access the website rather we use a name like google.com or facebook.com. Just imagine how hard would it be to remember IP addresses of all these website, if these names for not in use. So, how does these name translate into IP addresses, that's because of DNS servers.
DNS
DNS (short for Domain Name System) is a service which translates IP address into domain name & vice-versa. In environment with only a limited numbers of Linux machines, we can make entries in /etc/hosts file for associating an IP address with a name but when you have a large infrastructure with lots and lots of systems/resources, /etc/hosts will not work. For these kind of scenarios, we implement BIND (DNS) in our environment.
BIND or Berkeley Internet Name Domain, is most widely used Open source software that implements DNS protocols for internet, which provides us ability to implement IP to domain name conversion & vice-versa .
In this tutorial, we will learn to implement BIND (DNS) server in our local environment. But before we do that there are some DNS records that we need to be aware of. Although there are a number of DNS records but we will only discuss some of the important ones which will be used in this tutorial.
DNS records
A record is used to map hostname to an IPaddress
NS (Name server) record identifies authoritative DNS server for the zone
MX (mail exchanger) record specifies a mail server responsible for accepting of mail in the zone
CN (canonical name) record specifies alias of one name to another name,
PTR (Pointer) record are reverse DNS record i.e. from IP address to hostname
SOA (Start of Authority) record contains information about that DNS zones & other DNS records.
Now, let’s start with installation & configuration of DNS/BIND
Scenario
In our scenario, we need a DNS server machine & a client machine for testing
DNS server Name dns.ltechlab.com Client name client1.ltechlab.com
IP address 192.168.1.100 IP address 192.168.1.101
Installation
Firstly, we will install BIND package with the following command
$ yum install bind bind-utils
After these packages have been installed, we will move onto configuration part.
Note:- Before we move to configuration, make sure that you are able to ping your server by hostname. If not, open your /etc/hosts file & make following entry
192.168.1.100 dns.ltechlab.com
Configuration
Main configuration file BIND is /etc/named.conf & this is where we will be making most of the configurations. Now, open the configuration file & comment the following lines,
#listen-on port 53 { 127.0.0.1; };
#listen-on-v6 port 53 { :!! };
This is will let our DNS server to listen to all IPs, next we will add our network to the file so that clients from our network can query DNS
allow-query { localhost;192.168.1.0/24; };
next if you are using a slave server also, mention that also (optional) (will discuss master-slave setup in future tutorial)
allow-transfer { 192.168.1.110; }; (slave IP address)
Now, we will be creating our zone files.
Creating Zones entries
Firstly we will create a forward zone entry in /etc/named.conf for our domain ltechlab.com. Add the following lines in named.conf
zone "ltechlab.com" IN {
type master;
file "fwd.ltechlab.com.db";
allow-update { none; };
};
Here, ‘ltechlab.com’ is the Domain name,
‘master’ is the Primary DNS,
fwd.ltechlab.com.db is the Forward lookup file,
‘allow-update’ will be none, its the primary DNS.
Similarly, we will now create an entry for reverse zone as well in”named.conf”
zone "1.168.192.in-addr.arpa" IN {
type master;
file "1.168.192.db";
allow-update { none; };
};
Here,
1.168.192.in-addr.arpa is Reverse lookup name,
master is for Primary DNS,
1.168.192.db is the reverse lookup file,
allow-update – will be set to none, since this is the primary DNS.
Our configuration for “named.conf” is complete & next we will create zone files for our BIND server.
Creating zone files
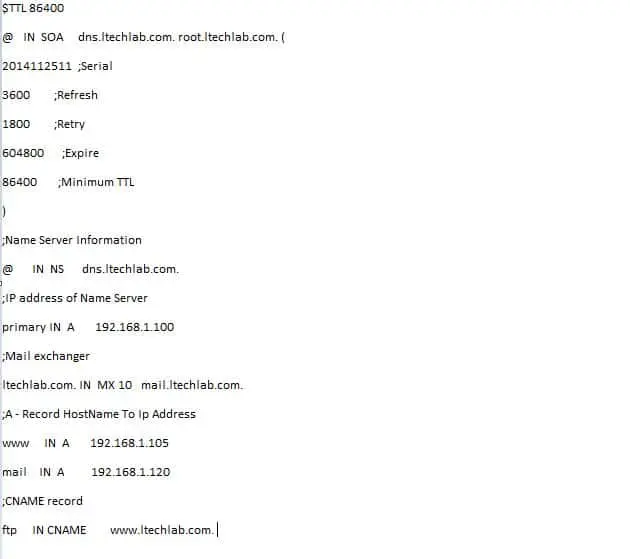
We will first create our forward zone file i.e “fwd.ltechlab.com.db” in “/var/named” folder and then will make the following entries in it
$TTL 86400
@ IN SOA primary.ltechlab.com. root.letchlab.com. (
2014112511 ;Serial
3600 ;Refresh
1800 ;Retry
604800 ;Expire
86400 ;Minimum TTL
)
;Name Server Information
@ IN NS primary.ltechlab.com.
;IP address of Name Server
primary IN A 192.168.1.100
;Mail exchanger
ltechlab.com. IN MX 10 mail.ltechlab.com.
;A - Record HostName To Ip Address
www IN A 192.168.1.105
mail IN A 192.168.1.120
;CNAME record
ftp IN CNAME www.ltechlab.com.

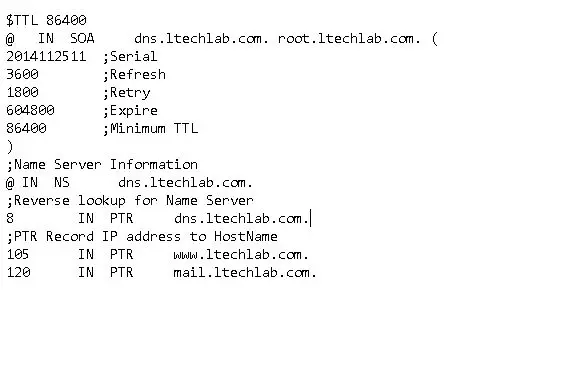
Similarly, we will create reverse zone file named “1.168.192.db” in “/var/named” folder with the following content
# vi /var/named/1.168.192.db
$TTL 86400
@ IN SOA dns.ltechlab.com. root.ltechlab.com. (
2014112511 ;Serial
3600 ;Refresh
1800 ;Retry
604800 ;Expire
86400 ;Minimum TTL
)
;Name Server Information
@ IN NS dns.ltechlab.com.
;Reverse lookup for Name Server
8 IN PTR dns.ltechlab.com.
;PTR Record IP address to HostName
105 IN PTR www.ltechlab.com.
120 IN PTR mail.ltechlab.com.

After creating these zone files, we will restart our BIND server
service named restart ,or,
systemctl restart named.service
Now, we will verify our zone files.
Verifying the zones
Login to your client machine i.e. client1.ltechlab.com & open “/etc/resolve.conf” and enter following entry
nameserver 192.168.1.100
Or change the DNS entry in /etc/sysconfig/network-scripts/ifcfg-e....
DNS1=192.168.1.100
and restart your network services
service network restart ,or,
systemctl restart network
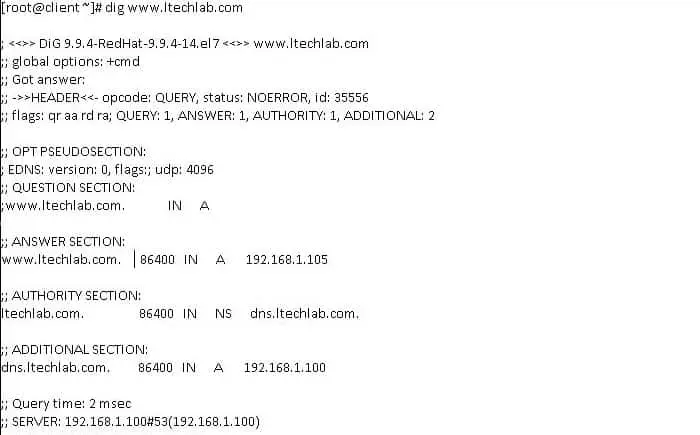
Now that we have made the changes on our client machine, we will make sure that our DNS serevr is working fine by running “dig ” command against our web server name i.e. www.ltechlab.com (dig command is a tool for querying DNS servers)

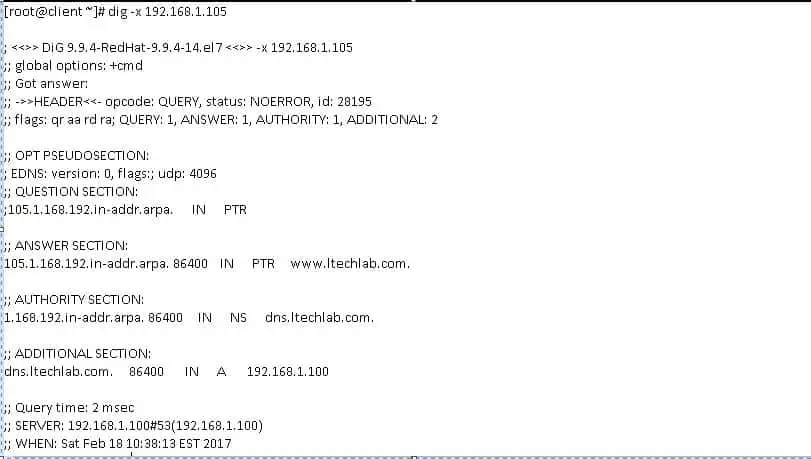
We have received an output to our query successfully. Now, let’s check if our reverse zone is working fine or not

NOTE :- If you receive an error while running “DIG” command on client machine, install “bind-utils” package on the machine.
That’s it guys, we have successfully created our DNS server using BIND & will also post a tutorial soon with Master-slave setup. If you have any queries/comments, please mention them in the comment box down below.
If you think we have helped you or just want to support us, please consider these :-
Connect to us: Facebook | Twitter | Google Plus
Become a Supporter - Donate us some of you hard earned money: [paypal-donation]
Linux TechLab is thankful for your continued support.

what are the zones
reverse zone or farwords zone
Zones are basically a section of DNS. Forward lookup zones are used to lookup an ip address from the supplied domain name and reverse zones are just opposite of forward zones i.e.they provide domain name resolution from the provided ip address.
I hope that answers your question.
Very well explained , however I see a typo in the section for creating the forward zone – The black picture has the correct data. However, in the following lines, the SOA record should mention primary.ltech.com, not dns,ltech.com
This is really helpful, thanks.
hello first thanks for this and for other topics or tutorials
This my first time trayning to configuring bind for next setingup zimbra
can you please explain the 192.168.1.105 and 192.168.1.120 are for what and the 8 when you create the reverse zone file
thank you again
these are just two example servers, one is web server other is mail server.
I have a problem, that when I try to start the server I get error saying, that there was an error loading the zone file – permission denied. I tried even 777, but still doesn’t work.
very nice tutorial
thank you
Is there an easy way to make an entry to mimic a hosts file?
I travel and when at home i can’t do a hairpin, so I un/comment a line in /etc/hosts so the FQD points to an internal IP when at home, and FDQ when traveling.