This article continues our previous guide, "Run AWS Locally: Simulate AWS Services on Your Laptop," in which we explored the power of LocalStack for local AWS development and testing. While the command-line interface (CLI) is robust, sometimes a visual representation can significantly enhance your workflow and understanding of your local AWS environment.
Enter LocalStack GUI, a user-friendly graphical interface that provides an intuitive way to interact with your running LocalStack instance. Part two will guide you to install Localstack GUI, allowing you to visualize and manage your simulated AWS services with ease.
Why Use LocalStack GUI?
While the AWS CLI and SDKs are essential for programmatic interaction, LocalStack GUI offers several advantages:
- Visual Inspection: Easily browse and inspect your created resources like S3 buckets, DynamoDB tables, Lambda functions, and more without needing to remember specific CLI commands.
- Simplified Management: Perform basic management tasks like viewing logs, examining configurations, and even performing simple actions directly through the GUI.
- Enhanced Understanding: A visual representation can help you grasp the relationships between different AWS services and how your local setup mirrors the real cloud environment.
- Improved Debugging: Quickly identify and troubleshoot issues by visually inspecting the state of your resources.
- Beginner-Friendly: For those new to AWS or LocalStack, the GUI provides a more accessible entry point to explore and understand the services.
Prerequisites:
Before we install LocalStack GUI, ensure you have the following:
- LocalStack Installed and Running: You should have LocalStack successfully installed and running on your system, as described in Part 1 of this guide.
- Docker: LocalStack itself relies on Docker, and the GUI is typically distributed as a Docker image as well. Ensure Docker is installed and running on your machine.
Installation Methods:
There are primarily two ways to install and run LocalStack GUI: using Docker directly or through pip (if available as a standalone application). We will focus on the recommended Docker method.
Method 1: Running LocalStack GUI with Docker
This is the most straightforward and recommended method.
-
Pull the LocalStack GUI Docker Image: Open your terminal or command prompt and execute the following command to download the official LocalStack GUI Docker image from Docker Hub:
docker pull localstack/localstack-proNote: While the image name includes
-pro, the basic GUI functionality is often available even without a LocalStack Pro license. However, some advanced features might require a Pro subscription. Check the official LocalStack documentation for the latest licensing details. -
Run the LocalStack GUI Container: Once the image is downloaded, run the container. You'll need to map a port on your host machine to the GUI's default port (8080). Ensure your LocalStack instance is already running (using
localstack start).docker run --rm -p 8080:8080 -e LOCALSTACK_HOST_IP=host.docker.internal localstack/localstack-proLet's break down this command:
docker run: This command runs a new Docker container.--rm: This flag automatically removes the container when it exits.-p 8080:8080: This maps port 8080 on your host machine to port 8080 inside the container (where the GUI runs). You can change the host port if 8080 is already in use.-e LOCALSTACK_HOST_IP=host.docker.internal: This environment variable is crucial for the GUI to communicate with your running LocalStack instance on the host machine. The exact value might vary slightly depending on your operating system (e.g.,docker.for.mac.localhoston macOS). Consult the LocalStack documentation for OS-specific configurations if you encounter issues.localstack/localstack-pro: This specifies the Docker image to run.
-
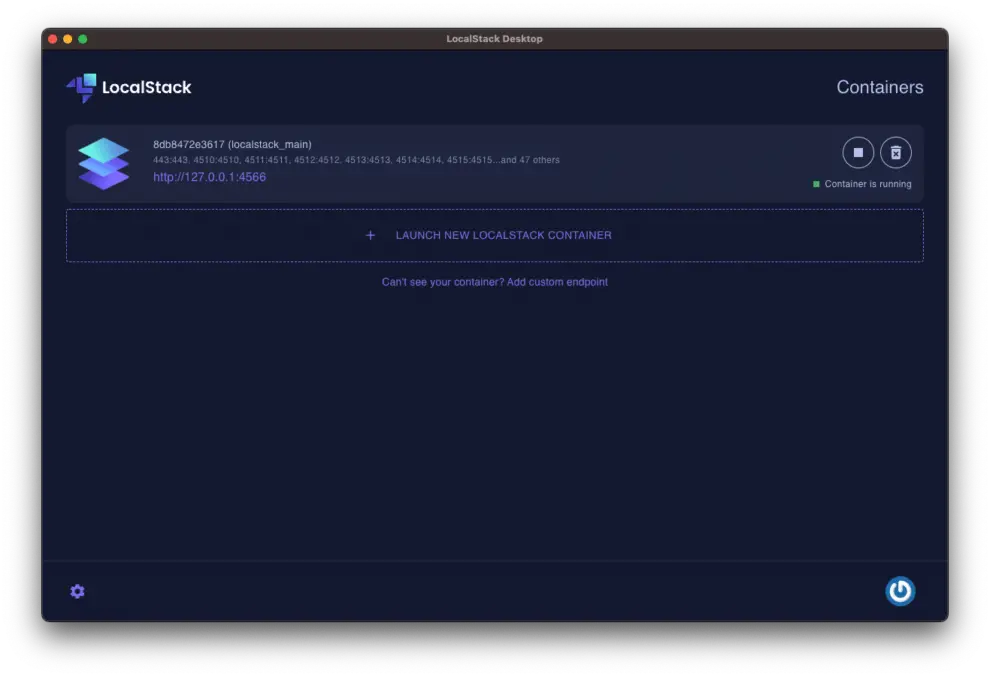
Access the LocalStack GUI: Once the container is running, open your web browser and navigate to
http://localhost:8080(or the port you mapped in thedocker runcommand). You should now see the LocalStack GUI interface.
Method 2: Installing with pip (If Available)
In some cases, LocalStack GUI might be available as a standalone Python package installable via pip. However, this method might be less common and could have more dependency requirements.
-
Install using pip:
pip install localstack-gui # The exact package name might vary -
Run the GUI: After installation, there might be a command to launch the GUI. Check the LocalStack GUI documentation for the specific command (it could be something like
localstack-guiorlocalstack gui start).
Connecting the GUI to Your LocalStack Instance:
If you followed the Docker method with the -e LOCALSTACK_HOST_IP environment variable, the GUI should automatically detect and connect to your running LocalStack instance.
If you used the pip method or need to configure the connection manually, the GUI interface will likely have a settings or connection section where you can specify the endpoint of your LocalStack instance. The default LocalStack endpoint is usually http://localhost:4566.
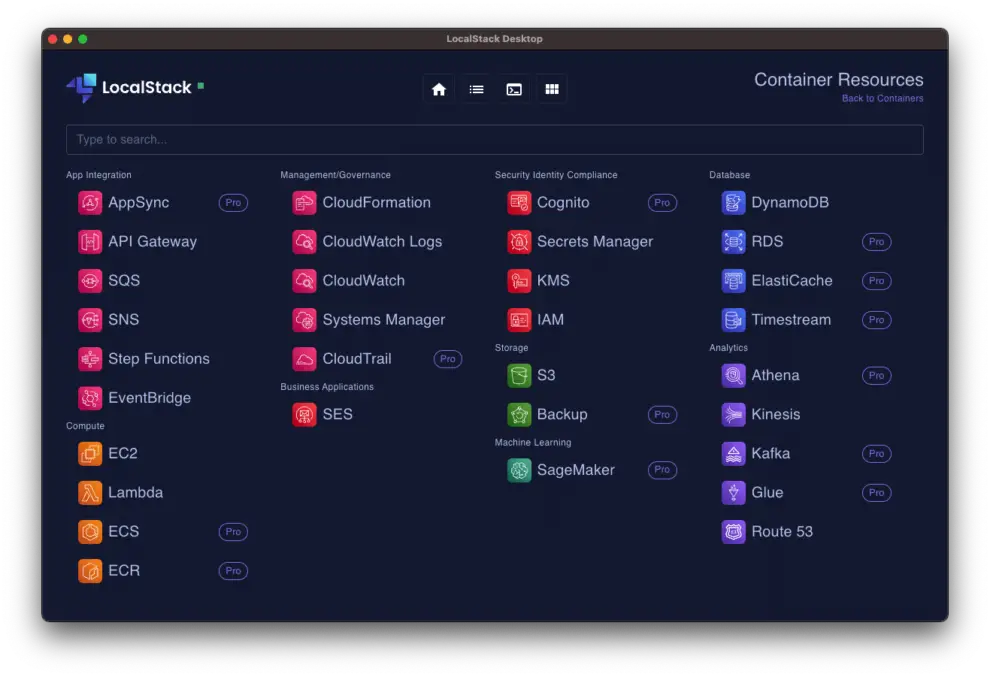
Exploring the LocalStack GUI:
Once you have the GUI running and connected, you'll be presented with a dashboard or a list of AWS services. You can then:
- Browse Services: Click on different AWS services (like S3, DynamoDB, Lambda, etc.) in the sidebar or main view.
- Inspect Resources: Within each service, you can view the created resources, their configurations, and sometimes even their data (e.g., objects in S3 buckets, items in DynamoDB tables).
- View Logs: For services like Lambda and API Gateway, the GUI often provides access to logs, making debugging easier.
- Perform Basic Actions: Some GUIs might allow you to perform basic actions like creating or deleting simple resources directly from the interface.
Troubleshooting:
- "Connection Refused" or "Unable to Connect": Ensure that your LocalStack instance is running before you start the GUI container. Double-check the
LOCALSTACK_HOST_IPenvironment variable in yourdocker runcommand and ensure it's correct for your operating system. Verify that the ports are correctly mapped. - GUI Not Loading: Check the Docker container logs for any errors. Ensure your web browser is not blocking the connection.
- Missing Resources: If you've created resources via the CLI or SDK and they are not appearing in the GUI, ensure the GUI is correctly connected to the same LocalStack instance.
Conclusion:
LocalStack GUI provides a valuable visual layer on top of your local AWS development environment. By following this tutorial on how to install Localstack Gui outlined in this article, you can gain a more intuitive understanding of your simulated AWS services, simplify management tasks, and enhance your overall development and testing workflow.
Experiment with the GUI's features and discover how it can streamline your interaction with LocalStack. Remember to consult the official LocalStack documentation for the most up-to-date information and advanced configuration options.
We are giving you exclusive deals to try Linux Servers for free with 100$ credit, check these links to claim your 100$,
DigitalOcean - 100$ free credit & Linode - 100$ free credit
Check some Exclusive Deals, HERE.
Also, check out DevOps Book You should read section.