
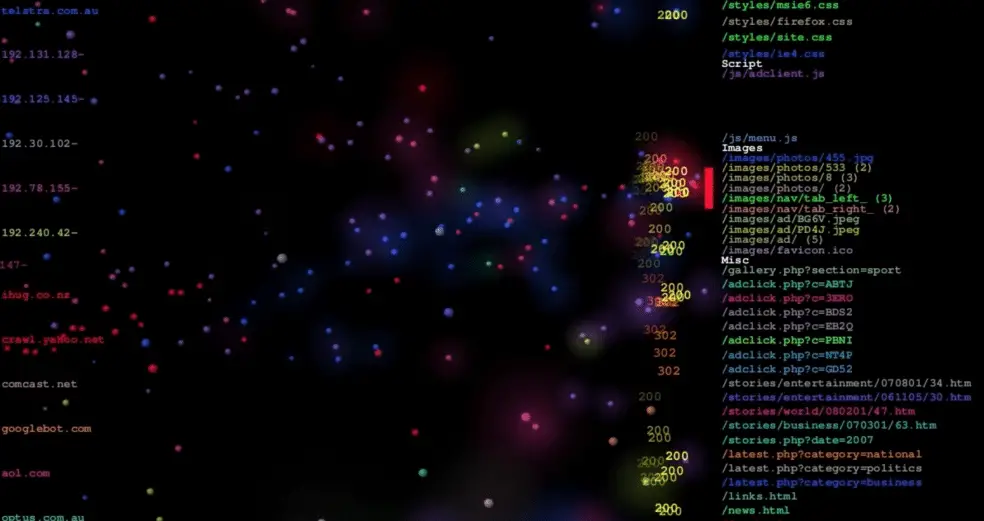
There are many tools available to analyze the web server logs but none is as interesting as logstalgia. Logstalgia is a real-time website visualization tool that analyzes the web server logs & presents them in a manner that server logs appear like they are playing ping-pong.
Requests appear as colored balls (the same color as the host) which travel across the screen to arrive at the requested location. Successful requests are hit by the paddle while unsuccessful ones (eg 404 - File Not Found) are missed and pass through.
The paths of requests are summarized within the available space by identifying common path prefixes. Related paths are grouped together under headings. For instance, by default paths ending in png, gif or jpg are grouped under the heading Images. Paths that don’t match any of the specified groups are lumped together under a Miscellaneous section.
Logstalgia requires a video card with OpenGL support to analyze the web server logs & than visualize them. In this tutorial, we will learn to install logstalgia on a Ubuntu machine.
Installation on Ubuntu
We can easily install logstalgia with apt-get command, i.e.,
$ sudo apt-get install logstalgia
But the installed package might not be the latest one (which at the time of writing is 1.10 for Linux machines). So we will be using the latest tar package & install the package from source but before we do that we need to install some package dependencies.
Install on other Linux OS
Run the following command from your terminal to install the required dependencies on your Ubuntu machines (If installing on other OS than Ubuntu, install the equivalent dependencies),
$ sudo apt-get install libsdl1.2-dev libsdl-image1.2-dev libpcre3-dev libftgl-dev libpng12-dev libjpeg62-dev
Once installed, we will download the latest tar package on our system with the following command,
$ wget https://github.com/acaudwell/Logstalgia/releases/download/logstalgia-1.1.0/logstalgia-1.1.0.tar.gz
Now extract the package & enter into the folder,
$ tar –xvf logstalgia-1.1.0.tar.gz
$ cd logstalgia
Next , we will compile the package & install it with the following command,
$ ./configure
$ make
$ sudo make install
Analyzing webserver logs
If you have installed the logstalgia on the same system as the webserver, then we only need to run logstalgia command along with the location of web server access logs to start analyzing webserver logs. Execute the following command from the terminal,
$ logstalgia /var/log/httpd/access.log
Or we can also monitor the logs with tail command & provide it as in STDIN for logstalgia,
$ tail –f /var/log/httpd/access.log | logstaligia – - sync

If you have installed logstalgia on a separate machine than webserver & want to analyze the web server logs with logstalagia from that machine, then we need to login to web server from the remote machine. Run the following command to connect to web server & start analyzing the web server logs,
$ ssh user@webserver.linuxtechlab.com tail –f /var/log/httpd/access.log | losgtaligia – - sync
Here, user@webserver.linuxtechlab.com is the user name along with the webserver (webserver.linuxtechlab.com).This was our tutorial on how to analyze web server logs with Logstalgia in Real-time. With this we end our tutorial, please do send in your questions & queries using the comment box below.
Hi Team
while running ./configure script getting error. could you help out on this
[root@ip-172-31-22-214 logstalgia-1.1.0]# ./configure
checking for a BSD-compatible install… /bin/install -c
checking whether build environment is sane… yes
checking for a thread-safe mkdir -p… /bin/mkdir -p
checking for gawk… gawk
checking whether make sets $(MAKE)… no
checking whether make supports nested variables… no
checking build system type… x86_64-pc-linux-gnu
checking host system type… x86_64-pc-linux-gnu
checking for g++… no
checking for c++… no
checking for gpp… no
checking for aCC… no
checking for CC… no
checking for cxx… no
checking for cc++… no
checking for cl.exe… no
checking for FCC… no
checking for KCC… no
checking for RCC… no
checking for xlC_r… no
checking for xlC… no
checking whether the C++ compiler works… no
configure: error: in `/home/ec2-user/logstalgia-1.1.0′:
configure: error: C++ compiler cannot create executables
See `config.log’ for more details
You need to install the gcc-c++ package, that should solve the issue.