The first thing that we do after installing an operating system is to configure the IP address i.e. networking on the machine. Whether we want to connect to the internet or only to our local area network (LAN), we must provide information regarding our network to the machine. In this tutorial, we are going to discuss how to configure IP address in Linux (RHEL/CentOS 7) using three different methods.
Also if you would like to assign an IP address to your Ubuntu system, then please refer to this tutorial How to manage network in Ubuntu 18.04 – Netplan Command or you can also refer to the tutorial for IP COMMAND, using which you can manage the network on all Linux distributions that have IP command installed.
(Recommended Read: IP Aliasing: Assigning multiple IP addresses to single NIC)
Configure IP address in Linux
Method 1- By editing the Network Interface file
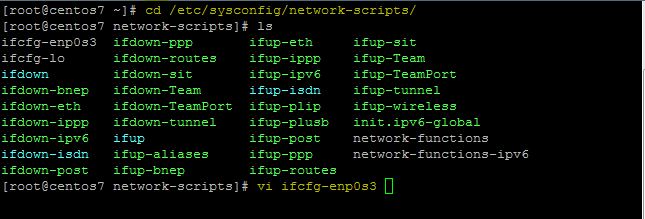
This method works on all Linux distributions. To configure the IP address, we need to open the network configuration file & pass our network information in the file. In RHEL/CentOS 7, location for all network interfaces in '/etc/sysconfig/network-scripts', in our case name of network interface is 'ifcfg-en0s3'. We will now edit the file to configure a static IP address for our system. Open the network interface file,
$ cd /etc/sysconfig/network-scripts
$ vi ifcfg-en0s3

To configure a static IP address, change the 'BOOTPROTO' to 'none' (it's DHCP by default) & enter IP address, gateway & DNS information. Also, change 'ONBOOT' to 'yes' so that we don't have to start networking services every time we restart our system.

After making all the changes, save the file & then restart the networking services to implement the changes.
$ systemctl restart network
$ vi ifcfg-en0s3
Method 2 - Using the Graphical interface
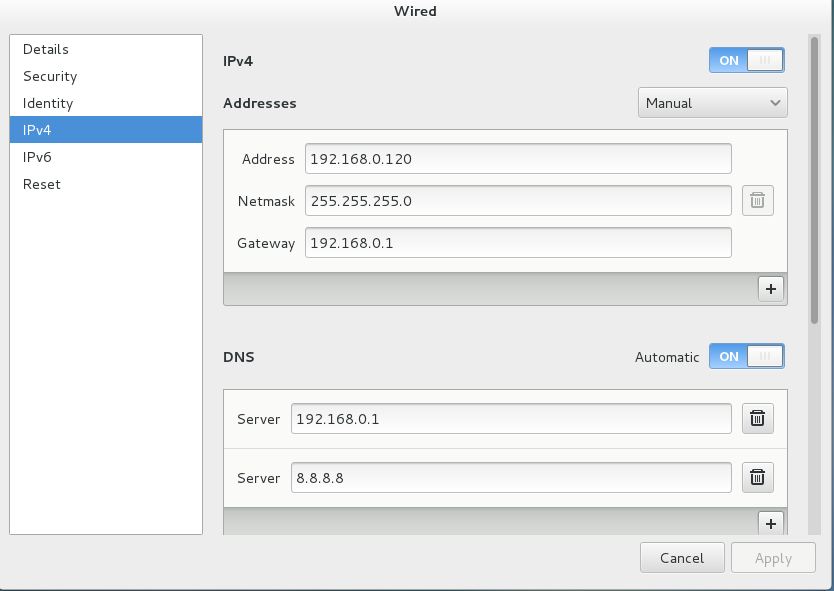
If we are using RHEL/CentOS with GUI then we can easily configure IP address graphically. Open 'Network' either by clicking the network icon & then selecting 'Network Settings' on the top-left corner of the screen or goto Applications-> System Tools-> Settings-> Network.

Next, click on the Settings icon (on the bottom right corner of the opened window) & select IPV4 then mention your network information on the opened window.

After the IP information has been edited, click on apply & exit from the menu. Lastly restart network services for implementing the changes.
Method 3- Using NMTUI command
This method can be used in GUI as well as in CLI. For using it in GUI mode, open a terminal and enter the command 'nmtui' & press enter or if using CLI, just enter the command 'nmtui' & press enter. This will open a new window with 3 options i.e. we can edit our network interface, activate a network interface, or set a hostname for our system (read our tutorial on setting hostname HERE ).
$ nmtui
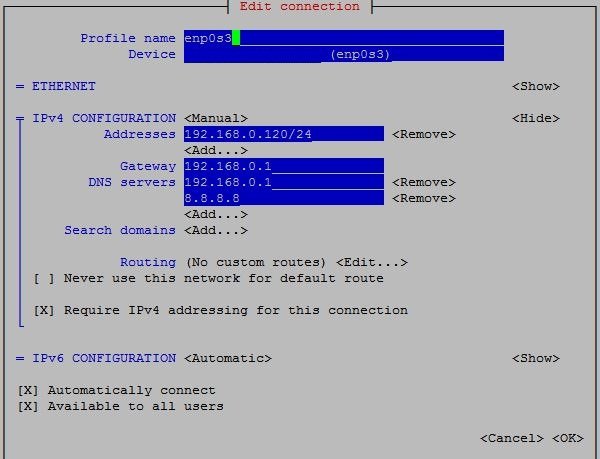
To set up networking for the system, select 'Edit a connection', select your network interface & then select 'Edit' using the arrow keys. In the 'IPv4 Configuration' select 'manual' & then enter your network information.

After making changes, press 'OK' to save the file & on the next screen press 'Quit' to exit from the menu. Restart your network services for changes to take effect.
Apart from these three methods, you can also configure IP address when installing operating system & also there are two more methods through which we can configure our network on RHEL/CentOS 7 machines i.e. by using 'nmcli command & ifconfig command. This wraps up our tutorial on how to configure IP address in Linux. For any queries/questions, please use the comment box below.

That was very helpful, thank you.
Best regards.
Reed