RAID aka Redundant Array of Inexpensive Disk aka Redundant Array of Independent Disk is a data storage technology which uses a number of disks & uses them as a single logical storage unit to provide us with data redundancy, performance or both.
There are two ways to implementing RAID technology into your environment i.e.
- Software RAID can be used with most of the modern Linux distributions but they have low performance as they use the resources pf their host but have advantage of being cheap as no dedicated hardware is needed,
- Hardware RAID have their dedicated hardware know as RAID controllers which have its own memory modules & thus doesn't use the resources of the host. They have good performance but are very costly to use.
We are going to discuss software RAID for this tutorial. Both software RAID & Hardware RAID have various levels in which they are configured, based on the requirements like performance, data redundancy etc.
For this tutorial , we going to learn to configure RAID0 on our systems. (Also recommend you to read tutorial on LVM )
RAID 0
RAID0 or striping, requires at least 2 disks to be configured. It strips the data & saves them on multiple disks on the system. It provides excellent performance as data is striped into multiple disks but provides zero data-redundancy & should only be used for non-critical systems.
So now we are going to start configuring RAID0 & we will be using ‘mdadm’ utility to do it. For purpose of this tutorial, we will be using 2 disks named /dev/sdb & /dev/sdc with capacity of 100GB each.
Configuration
STEP 1
Firstly we need to install ‘mdadm’ utility on our system, if not installed already
$ yum install mdadm
Step 2
After installing ‘mdadm’, we will prepare our disks sdb & sdc for RAID configuration with the help of ‘fdisk’
- Firstly we will prepare /dev/sdb disk for LVM, start by
$ fdisk /dev/sdb
- Type ‘n’ for creating new partition,
- Next type ‘p’ for creating the primary partition (since this is new disk, partition number will be 1 )
- Next for First cylinder value & last cylinder value, press enter to use default values i.e. full hdd space
- Type ‘t’ for accessing the partition followed by ‘1’ (partition number)
- Now this is the part where we will enter the partition id for creating RAID i.e.’ fd’. Type ‘fd’ now & press ‘w’ to write changes.
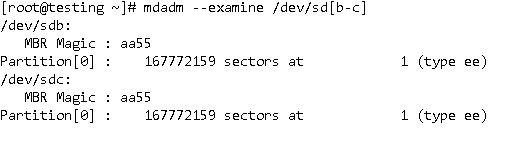
Same process is to be followed for /dev/sdc as well. When both disks have been partitioned, we can examine them using
$ mdadm –examine /dev/sd[b-c]
Step 3
Now that we have partitioned both our disks, we will create RAID array (aka md device) named ‘/dev/md0’ (default) using the following command
$ mdadm -C /dev/md0 -l raid0 -n 2 /dev/sd[b-c]1
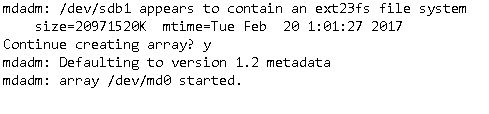
Here, '-C /dev/md0' will create md device named ‘/dev/md0’,
'-l raid0', means raid level which here is RAID0 (stripping),
& lastly '–n 2' , means number of disks which is 2.
STEP 4
We will now verify our RAID array by running the following command
$ cat /proc/mdstat

STEP 5
RAID array is ready but still can’t be used as we have not assigned it a filesytem & we also need to mount the array on our system. So we will assign a filesystem first using ‘mkfs’ command
$ mkfs.ext4 /dev/md0
& next we will mount it on /data,
$ mkdir /data
$ mount /dev/md0 /data
But this is only a temporary mount & will not survive a reboot. So we will make an entry into /etc/fstab
$ vi /etc/fstab
/dev/md0 /data ext4 defaults 0 0
Save & exit the file. Our RAID array is now permanently mounted to /data.
STEP6
Lastly, we will create backup of the RAID configuration in order to use it further
$ mdadm -E -s -v >> /etc/mdadm.conf
$ mdadm --detail --scan --verbose >> /etc/mdadm.conf
$ cat /etc/mdadm.conf

Our RAID0 configurations are now complete.
We now end our tutorial on configuring raid0 on CentOS/RHEL systems. If having any doubts/queries, mention them in the comment box below.
If you think we have helped you or just want to support us, please consider these :-
Connect to us: Facebook | Twitter | Google Plus
Become a Supporter - Donate us some of you hard earned money: [paypal-donation] Linux TechLab is thankful for your continued support.