
Hello Linux-fanatics, in this tutorial we will be creating DHCP server for our IT environment. It is an important service & is used in almost all organization with large number of users & also in homes with less number of users. So, actually what is it ?
DHCP
It stands for Dynamic Host Configuration Protocol & it’s a network protocol that is used to automatically assign IP addresses to clients in an environment, from a predefined range of IP addresses. It save lots of time for sysadmin/network admin, as we don’t have to manually configure network in hundreds of machine, its all done automatically. It is wise to assign IPs automatically to normal clients but for critical servers, one should avoid using it & provide static IPs instead.
Now that we have an understanding, we will creating DHCP server on RHEL\CentOS machines.
(Recommended Read: Monitoring network bandwidth with iftop command)
(Also Read: Networking Bonding in RHEL/CentOS 7: Combining multiple NICs into one)
Installation
To install DHCP, run the following command
$ yum install dhcp
That's it. Installation is done & we will move on to configuration part
Server Configuration
For configuring dhcp-server, there is a sample file (/usr/share/doc/dhcp-4.2.5/dhcpd.conf.example) that we will use. We will copy the file to ‘/etc/dhcp/dhcpd.conf’ which is the default location for the configuration file,
$ cp /usr/share/doc/dhcp-4.2.5/dhcpd.conf.example /etc/dhcp/dhcpd.conf
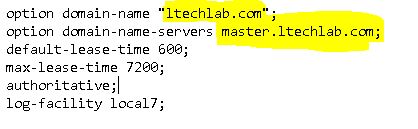
Next, open ’dhcpd.conf’ & edit the file, firstly we will add our domain details,
then we will specify the subnet & range of IP addresses to be used,

and save, exit the file. Our configuration for server are now complete, we will now restart our service to implement changes made to the configuration file.
$ systemctl restart dhcp
$ systemctl enable dhcp
Note:- For CentOS/RHEL 6, we have to make an additional change. We need to define which network interface will be used by dhcp. It will be defined in ‘/etc/sysconfig/dhcpd’, open the file
$ vi /etc/sysconfig/dhcpd
and add the following line to the file,
DHCPDARGS=eth0
finally save the file & exit.
Client Configuration
In order to test if our server is working or not, we will configure our client to receive IP address automatically. This is done by making changes in ‘/etc/sysconfig/network-scripts/ifcfg-eth1’
$ vi /etc/sysconfig/network-scripts/ifcfg-eth1$ systemctl enable dh
and we only have to change 'BOOOTPROTO' to 'dhcp' ,
DEVICE=eth1
BOOTPROTO=dhcp
TYPE=Ethernet
ONBOOT=yes
finally restart network services on client machine & we should now have an IP address assigned to it automatically.
Reserving an IP address
We can also reserve an IP address for a particular machine i.e. suppose a testing machine is required to have same IP, we will reserve an IP address for it. To reserve an IP address, open configuration file ‘dhcpd.conf’ & add the following lines to it,
host Testing-machine {
hardware ethernet 00:21:51:1q:f9:5t;
fixed-address 192.168.1.25;
}
As you must have noticed, we will require Hardware or MAC address of the machine which we can easily get using ‘ifconfig -a’. Restart the service & the mentioned IP address will now be reserved for the Testing-machine.
That’s it guys, this was our article on creating DHCP server. Your queries & feedback is always welcomed. Please use our comment box below. Thank You.
If you think we have helped you or just want to support us, please consider these :-
Connect to us: Facebook | Twitter | Google Plus
Donate us some of you hard earned money: [paypal-donation]
Linux TechLab is thankful for your continued support.