
Joomla is free and open source CMS or content management system used for publishing content online & for creating online applications/Websites. It is said to be one of the best CMS, second only to WordPress & it powers millions of websites.
Using Joomla does not require you to have much technical knowledge or skills, we can create content easily with the help of built-in editor & that too without having to handle coding part. It is available for many OS like Linux, MacOS, Solaris, FreeBSD etc with support for thousands of extensions that increases it's performance & productivity further.
In this tutorial, we will learn to install joomla on Centos & Ubuntu systems. Let's start with pre-requisites for Joomla,
(Recommended Read: WordPress installation on Centos/RHEL 7)
(Also Read: Simple guide for CPanel installation on CentOS & RHEL)
Pre-requisites
- To install Joomla, we must first have LAMP server configured on our system. To install & configure LAMP, refer to our detailed tutorials (LAMP stack on CentOS/RHEL, LAMP stack for Ubuntu),
-
Install the php 7, run the following command to install php 7 onto your system,
$ sudo yum install -y http://dl.iuscommunity.org/pub/ius/stable/CentOS/7/x86_64/ius-release-1.0-14.ius.centos7.noarch.rpm
$ sudo yum -y install php70u php70u-pdo php70u-mysqlnd php70u-opcache php70u-xml php70u-mcrypt php70u-gd php70u-devel php70u-intl php70u-mbstring php70u-bcmath php70u-json php70u-iconv
Read our detailed tutorial on how to install or upgrade the php to php7.
Install Joomla
Process to install joomla is similar for both CentOS & Ubuntu. Firstly we will create a database and a user for Joomla in mysql/mariadb database server. Connect to database with the following command,
$ mysql -u root -p
than create a database named 'joomladb',
mysql> create database joomladb;
next we will create a new user for 'joomladb' with name 'joomla' & password 'Joomla@123',
mysql> create user joomla@localhost identified by 'Joomla@123';
Now grant all privileges to DB user 'joomla' for database 'joomladb' with the following command,
mysql> grant all privileges on joomladb.* to joomla@localhost;
Now implement the changes made & exit from mysql.
mysql> flush privileges;
mysql> exit
Next part is to download the joomla packages & keep them in apache document directory i.e. /var/www/html/.
Currently the latest version of joomla available is 3.8.2 , download it on your system with the following command,
$ wget https://downloads.joomla.org/cms/joomla3/3-8-3/Joomla_3-8-3-Stable-Full_Package.tar.gz
Now extract all the files in Apache root directory,
$ tar -xvzf Joomla_3-8-2-Stable-Full_Package.tar.gz -C /var/www/html/
Now provide the required permission to the folders,
$ sudo chown -R apache:apache /var/www/html/
$ sudo chmod -R 755 /var/www/html/
Next we need to make a change in our apache configuration file. Open the apache config file,
$ sudo vim /etc/httpd/conf/httpd.conf
& change the ‘AllowOverride’ parameter to the following,
AllowOverride All
Save the file & exit, than restart the apache service to implement the changes,
$ sudo systemctl restart httpd
Configuring Joomla
Now we can start the setup using a web browser, open a web browser & enter the URL for your web server, which in our case is following,
http://10.20.30.100
As soon as the URL is loaded, we will be greeted with the setup page for joomla,

Enter all the requested information & click on next to proceed to next step. On the next scree, we will be asked to enter the database details,

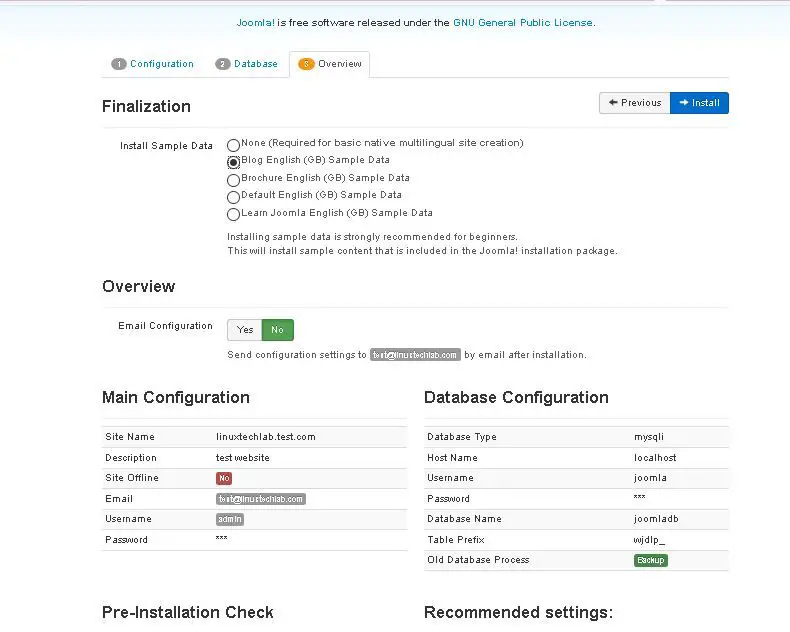
Enter all the database details, which we created earlier & hit next. In the final step, overview the configurations made & than hit install to complete the setup.
Once the setup has been finished, we will get the following screen & we can use it to either visit the website with the sample data or we can also access the administrative panel for joomla.

But before we visit the website, we need to remove the installation folder. Execute the following commands to remove the installation folder,
$ cd /var/www/html
$ sudo rm –rf installation
We can now check our website with the URL,
http://10.20.30.102

To visit the administrative panel for joomla, use the following URL,
http://10.20.30.100/administrator

& enter the credentials created during the setup, We now have access to the administrator area, here we can manage our website,

With this we end our tutorial on how to install Joomla on Linux machines. Please feel free to send in any questions or queries regarding the article using the comment box below.
If you think we have helped you or just want to support us, please consider these :-
Connect to us: Facebook | Twitter | Google Plus
Donate us some of you hard earned money: [paypal-donation]
Linux TechLab is thankful for your continued support.
Great steps. However, everything seemed to be going fine until I ran the last two commands to remove the installation files. When I go to my webserver’s url I get: “No configuration file found and no installation code available. Exiting…”
Well you should not be getting the error if steps were followed properly. Have a look at the procedure again & if that does not work check out https://forum.joomla.org/viewtopic.php?t=265091.
This should help.
I wound up blowing away the database, recreated it, recreated the users, re-downloaded and configured the joomla package, and manually removed the installation folder. I did have to manually create the configuration.php file per the warning. All is well now. Thanks for all the steps!
Nice to hear that it’w working now for you.