
DHCP servers are used almost in all organizations or even in our home routers for assigning IP addresses to get access to the internet. Usually, when we enable our network interface on our CentOS 7 or 8 systems, an IP address is assigned automatically through that DHCP server & we have access to the internet or to our LAN network. But we might be required to assign static IP addresses in our CentOS 7 or 8 machines.
So what do we do? We need to manually assign a static IP address to our servers. In this tutorial, we will learn how to assign static IP addresses in CentOS 7 or 8 machines.
There are two ways we can assign a static IP address in CentOS 8 systems,
1- Using Network manager
2- Assigning IP using network files
Let's discuss both these methods one by one.
Recommended Read: IP Route command: Create static routes or Change the default Gateway in Linux
Also Read: How to manage network in Ubuntu 18.04 – Netplan Command
1- Assign static IP using Network Manager
To configure a static using the network manager, we will be using a tool called 'nmtui'. NMTUI is a CLI-based user interface for Network Manager & even works for a system that does not have GUI installed.
To assign IP address, open terminal & execute the following command,
$ nmtui
You will see the following screen,

Click on 'Edit a connection', press ‘Enter’. Use the ‘Tab’ key to navigate.
On the next screen, select the network interface from the list of interfaces & press ENTER key,
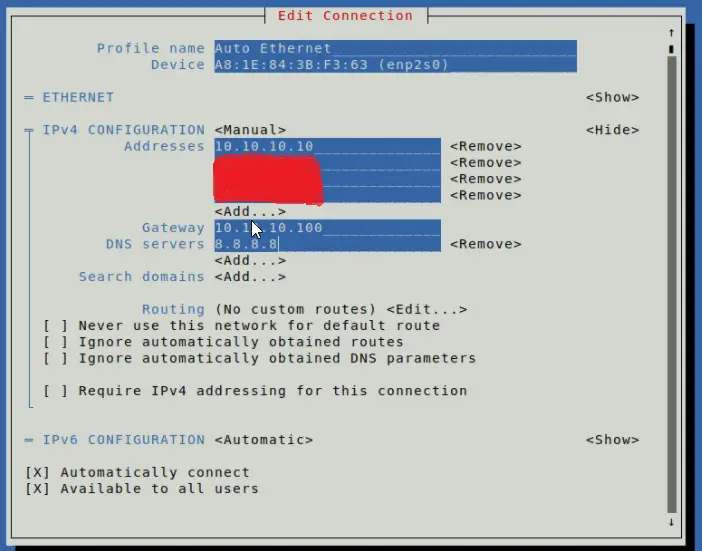
Add the IP address and other necessary details as required & complete the setup. Next, we need to restart the NetworkManager service to implement the changes,
# systemctl restart NetworkManager
2- Assigning IP using Network files
Network files for all the network interfaces are located in the directory ‘/etc/sysconfig/network-scripts'. Open the primary network interface file i.e. enp0s3, & add the following content to the file. Add what’s not in the file.
$ vi /etc/sysconfig/network-scripts/ifcfg-enp0s3
DEVICE="enp0s3"
BOOTPROTO=static
ONBOOT=yes
TYPE="Ethernet"
IPADDR=10.10.10.10
NETMASK=255.0.0.0
GATEWAY=10.10.10.100
HWADDR=32:0A:21:54:ND:6D
Save the file & restart the network service for changes to take effect.
# systemctl restart network
After the service has been started, our static IP has been assigned to our CentOS 8 system. To verify the assigned IP address, use the IP command,
# ip -a
That’s it, this completes our tutorial on how to assign a static IP in CentOS 7 or 8 systems. Please do send in any questions or queries using the comment box below.
We are giving you exclusive deals to try Linux Servers for free with 100$ credit, check these links to claim your 100$,
DigitalOcean - 100$ free credit & Linode - 100$ free credit
Check some Exclusive Deals, HERE.
Also, check out DevOps Book You should read section.
on this example “$ vi /etc/sysconfig/network-scriptsifcfg-enp0s3” I believe you left out a forward slash after network-scripts and before ifcfg-enp0s3. It should read “$ vi /etc/sysconfig/network-scripts/ifcfg-enp0s3”
Thanks for mentioning it, it’s been updated.