In this tutorial, we will learn how to perform Ubuntu backups using Timeshift. Timeshift is a fabulous tool that is used for the backup & restoration of the Linux operating system, it takes incremental backup after the first initial complete backup. TImeshit creates filesystem snapshots using Rsync or BTRFS. It has a nice GUI as well as support for CLI.
Timeshifts also have support for scheduled snapshots, multiple backup levels & also exclude filters. Snapshots can be easily restored even if the system is running from a Live CD or USB.
So let’s now start with the installation of Timeshift.
Recommended Read: Backup Linux data to Amazon S3 with CloudBerry Backup
Also Read: How to use SCP & RSYNC command line options to Backup your System
Install Timeshift in Ubuntu 20.04 or up
If you are running Ubuntu 20.04 or up, then you just need to run a single command to install Timeshift on Ubuntu as the timeshift packages are available in default repositories,
$ sudo apt install timeshift
Install Timeshift in Ubuntu 19.10 or older
If you are running Ubuntu 19.10 or older versions (which you should not be using), then you are required to add the repository for timeshift first & then install timeshift. Use the following commands to perform the actions,
$ sudo add-apt-repository -y ppa:teejee2008/ppa
$ sudo apt update
$ sudo apt install timeshift
Performing Ubuntu Backup using Timeshift
Now that we have the timeshift installed on our Ubuntu systems, we can start creating the snapshots for our Ubuntu installation. Browse or search the menu for timeshift & open it.
Once timeshift is opened, you will be asked to select the preferred snapshot type. You will have the options for selecting,
1- RSYNC - Rsync takes backup with the rsync command and also used hard links. Rsync backups are browsable using file managers.
2- BTRFS - with this mode, timeshift uses in-built features of BTRFS & then to restore snapshots, BTRFS should be supported with the Ubuntu-type subvolume layout.
You can select either but we will be using rsync,

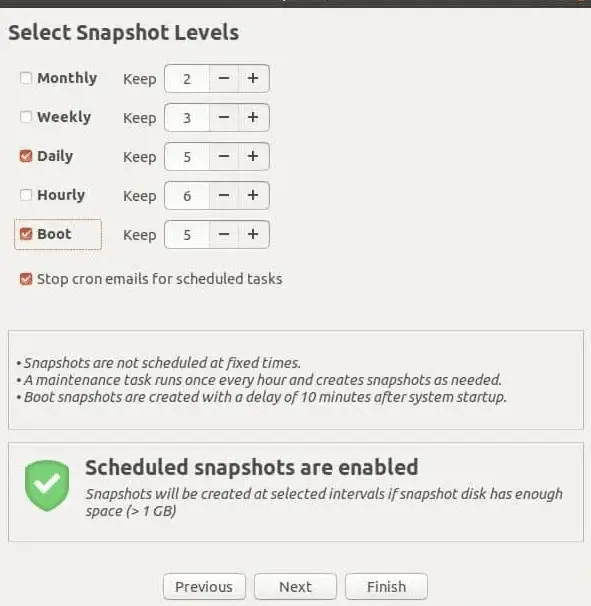
Once on the next screen, you are required to select the destination drive to save your snapshots. Select a suitable drive (which is not the source drive) & press ‘Next’. On the next screen, you will be asked to select screenshot level. It can be either ‘Monthly’, ‘Weekly’, ‘Daily’, ‘Hourly’ or on ‘Boot’,
Now click on ‘Finish’ to complete the setup. Now your initial setup is complete & you can start creating your backup snapshots. To create the backup, click on ‘Create’ on the main menu,
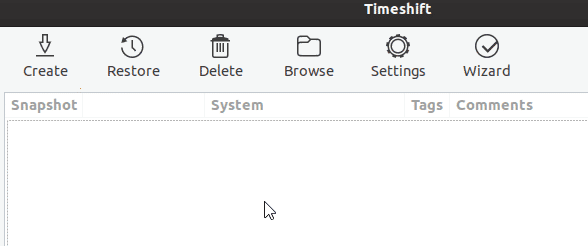
The backup process will now start and once it’s complete, click on ‘Finish’.
Restore the backup
Similar to how we created the backup, restoration is also pretty simple. From the main menu, click on the option ‘Restore’, & then select the snapshot from the list. Next, you need to provide the destination to where this snapshot needs to be restored.
Before clicking on restore, you can also perform ‘Dry Run’ to verify all files and folders. Once you are ok, you can click next & the restoration process will start. It will take some time to complete.
Now that we have discussed how to perform Ubuntu backup using the GUI, we will take a look at CLI commands as well.
Create Ubuntu backup using CLI
Timeshift also supports the command line to create and restore the backup. to create a backup, simply run the following command,
$ sudo timeshift --create --comments "Backup with CLI" --tags D
In tags, you can any of the following options,
--tags D stands for Daily Backup
--tags W stands for Weekly Backup
--tags M stands for Monthly Backup
--tags O stands for On-demand Backup
Restore a backup using CLI
To restore a backup using the timeshift in CLI, use the following command,
$ sudo timeshift --restore
You will then be asked to select a snapshot from the list by pressing the number for that snapshot. Then press enter key to continue.
For the next step, it will ask to Re-install the GRUB2 bootloader, press ‘Y’, and then again press ‘Y’ & enter to start the restoration process.
With this, we end our tutorial on how to backup Ubuntu using Timeshift. If you have any questions or queries, please do send them in using the comment box below.
We are giving you exclusive deals to try Linux Servers for free with 100$ credit, check these links to claim your 100$,
DigitalOcean - 100$ free credit & Linode - 100$ free credit
Check some Exclusive Deals, HERE.
Also, check out DevOps Book You should read section.
Timeshift is NOT a backup. It preserves the boot information. It can help in a pinch but does not preserve user data.