Earlier we have discussed the detailed installation of the Gitlab server on CentOS & Ubuntu systems. Once we have our Gitlab server ready, we must be able to perform common operations, some post-installation Gitlab setup like the ones mentioned below,
- Add SSH keys
- Create/Remove User
- Create/Remove Groups
- Create Project
In this Gitlab tutorial, we are going to discuss just that. We will learn how we can perform all these things step by step with the help of some screenshots.
Recommended Read: Informative guide to Gitlab tutorial for Beginners
Also Read: Easy & simple guide to Backup & Restore GITLAB
Gitlab Setup Tutorial
1- Add SSH keys
We need to add our ssh key to the Gitlab server as it allows us to access GitLab with authentication that does not require a username & password. To do this we first have to create public/private ssh keys, follow the steps mentioned below,
Open terminal & run the following command from terminal,
$ ssh-keygen -t rsa
We will first be asked to enter the file name, then the passphrase for the key. We can leave them as defaults by pressing the enter key. Now we should have a public Key by name ‘id_rsa.pub’ & a private key with the name ‘id_rsa’ in the folder ‘/home/user/.ssh’. We also have a detailed tutorial on creating SSH keys, you can READ IT HERE.
Now that we have ssh key ready, open Gitlab server & goto URL
https://GITLAB_URL/profile/keys
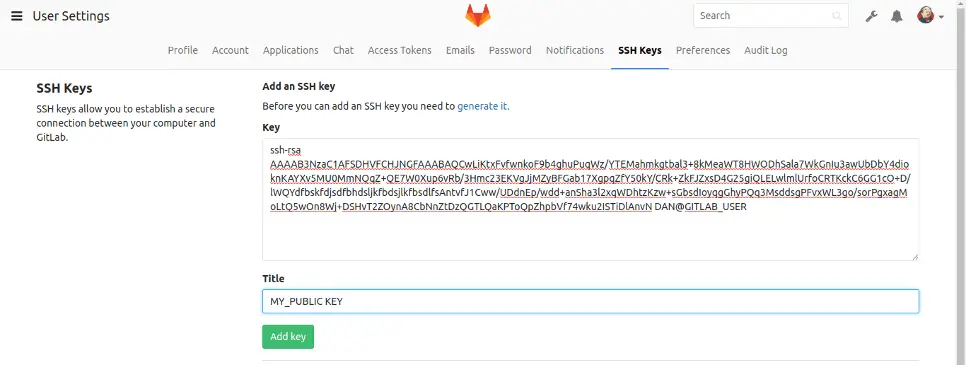
or you can also login to Gitlab with your user & then go to “Settings” & there look for “SSH Keys”. Now we need to copy the contents of ‘id_rsa.pub’ i.e. our ssh public key here. It should look something like this,

Next click on ‘Add key’ to save the ssh key. That’s it, we are done.
2- Create/Remove User
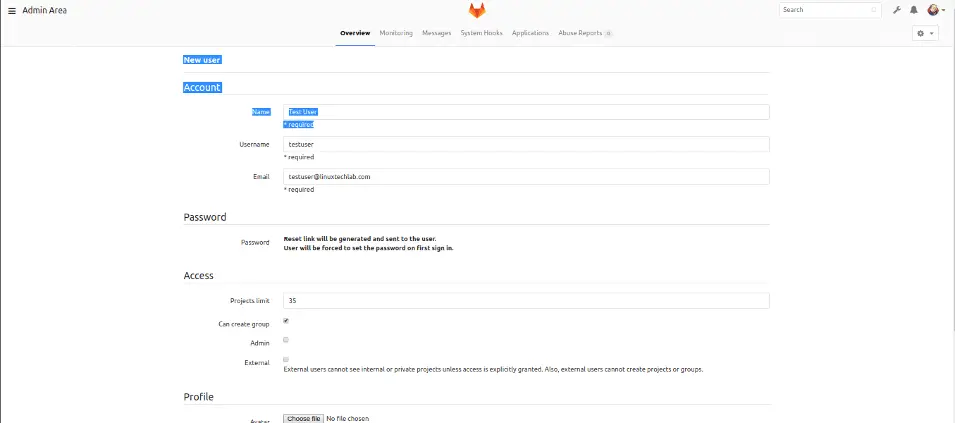
To create a new user for the Gitlab server, we need to go to ‘Admin Area’ after logging into GitLab. Admin Area can be accessed by clicking on the “Wrench” icon on the top right corner or alternatively we can use the following URL “https://GITLAB_URL/admin/users”.
Next click on the ‘Users’ tab in Admin Area & then click on ‘New User’,

Now Enter the details for user,

Once all the details have been entered, click on ‘Create User’ to complete the creation procedure.
Now if we need to remove access for the user from Gitlab, we can either Block the user or we can remove it permanently. Both these options can be accessed by clicking on setting options for the user,

Block or Delete the user as per requirement.
3- Create/Remove Groups
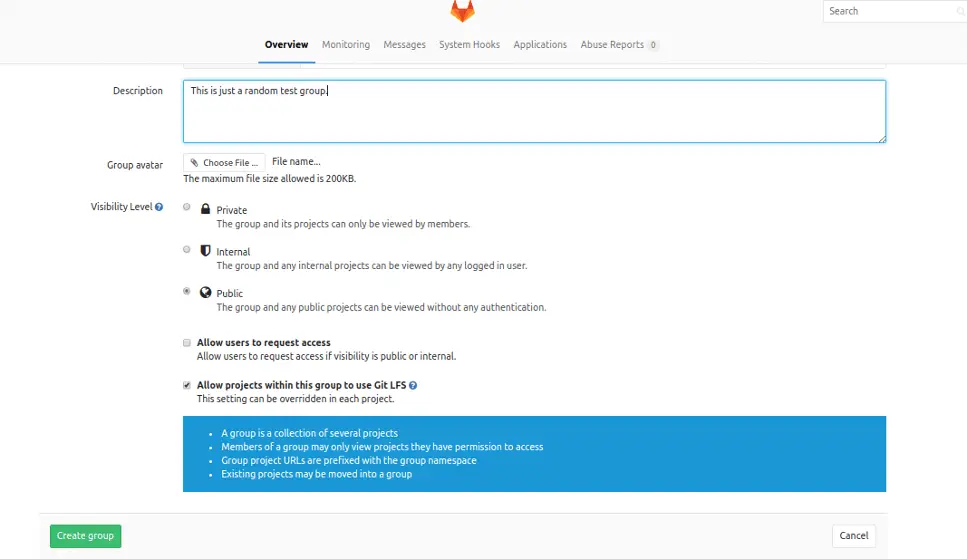
The process for creating Group is quite similar to creating a user. We go to ‘Admin Area’, look for tab ‘Groups’ & then click on ‘Create Group’. Then we need to enter the details regarding the group & whether we want to keep our group as ‘Public’, ‘Private’ or ‘Internal’.

Once done, click on ‘Create Group’ to create the group. Now we can add users or projects to the group by clicking on the Group name & then selecting either project or ‘Add users’ option there. To delete the project, we have an option where our group name is mentioned.
4- Create Project
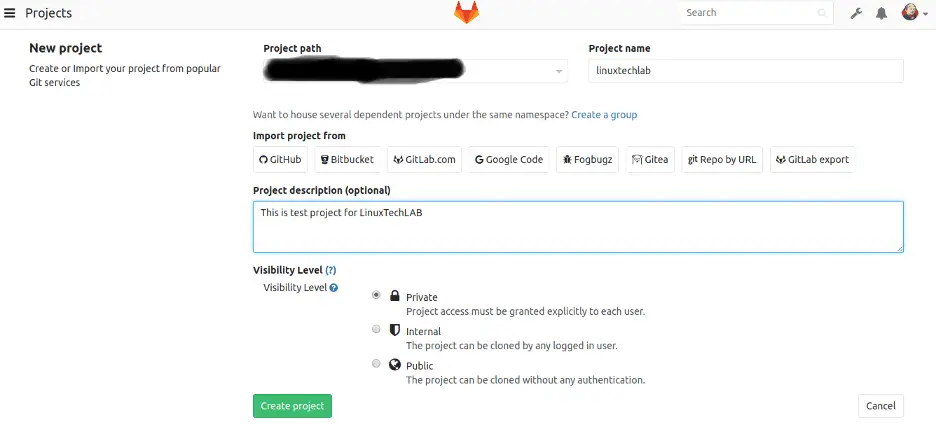
Option to create a new project should be on the first screen when you log in to the Gitlab server. Click on the icon ‘New Project’ & then on the next screen, mention all the details related to the project,

& click on ‘Create project’. & we can now start working on the project. To start working on Gitlab, we should have an idea of git commands, please refer to our article on ‘Some Useful Git commands’ to know about the git commands.
We now end this Gitlab setup tutorial on performing some common operations required after Gitlab installation. We are in process of writing some more tutorials regarding Git & Gitlab, so be back soon & please feel free to send in any questions or queries using the comment box below.
If you have found this article to be useful, please share it among your friends/colleagues/followers. THANKS !!!
We are giving you exclusive deals to try Linux Servers for free with 100$ credit, check these links to claim your 100$,
DigitalOcean - 100$ free credit & Linode - 100$ free credit
Check some Exclusive Deals, HERE.
Also, check out DevOps Book You should read section.

Great tutorial, I’ve just set up a GitLab server at work and will apply these suggestions.
One thing I did notice is some confusion between the words “then” and “than”, sadly this is quite common on the net.
“Then” is correctly used in a sequence of events: first this then that.
“Than” is correctly used to compare things: he is faster than I am.
In the article:
We will first be asked to enter the file name , (“than” should be “then”) the passphrase for key.
… clicking on the Group name & add (XthanX -> then) selecting either projects…
Click on the icon ‘New Project’ & (XthanX -> then)on the next screen…
The internet provides very useful information on just about everything except grammar and spelling, for those you need a decent dictionary (or dictionary website like oxford).
Thanks for your work on the tutorial.
Marvelous, what a webpage it is! This blog provides helpful information to us, keep it up.