In this tutorial, we will be installing KVM on CentOS or RHEL machines. KVM (also called QEMU) or Kernel Based Virtualization Machine is a Hardware based virtualization software that provide a Linux system capability to run multiple operating systems in Linux environment. It can run Linux as well as Windows family OS.
By hardware based virtualization, it means that your processor must support hardware virtualization to run KVM on your system. So if your processor is Intel based, it must support Intel VT or if you are using AMD based processor, it must support AMD-V. So before we proceed further with this tutorial we must check if your processor supports hardware virtualization or not. Most of the modern processors do support hardware virtualization but to be sure, please run the following command,
$ egrep '(vmx|svm)' /proc/cpuinfo
If you receive ‘vmx or svm’ in the output than processor supports hardware virtualization otherwise it doesn’t support it & you can’t install KVM/QEMU on your machine.
KVM/QEMU can be managed either graphically or through CLI. We use virt-manager for managing virtual machines, it can create, delete, edit & can also cold/live migrate guest machines between hosts.
(Recommended Read: Installing VirtualBox on Linux (CentOS & Ubuntu))
Installing KVM on CentOS or RHEL
For installing KVM, run the following command,
$ yum install qemu-kvmqemu-imgvirt-manager libvirtlibvirt-python libvirt-client virt-install virt-viewer
Now, let’s have a brief look at what these packages actually are,
- qemu-kvm is QEMU emulator, it’s the main package for KVM,
- qemu-img is QEMU disk image manager,
- virt-install is a command line tool to create virtual machines.
- libvirt , it provides daemon to manage virtual machines and controls hypervisor.
- libvirt-client , it provides client side API’s for accessing servers and virsh utility which provides command line tool to manage virtual machines.
- virt-viewer is the graphical console.
QEMU is now ready, we will now restart our virtualization daemon called ‘libvertd’,
$ systemctl restart libvertd
We will now create virtual machine with the help of virt-manager. But before we start with creating a virtual machine, we will have to configure a bridge adapter, which is required if we need to access outside network from our VM.
Creating a Bridge adapter
Copy file for your current network interface 'ifcfg-en0s1' to another file for bridge interface named 'ifcfg-br0'
$ cd /etc/sysconfig/network-scripts/
$ cp ifcfg-en0s1 ifcfg-br0
Now we will edit the file 'ifcfg-br0',
$ vi ifcfg-br0
TYPE=Bridge
BOOTPROTO=static
DEVICE=br0
ONBOOT=yes
IPADDR=192.168.1.110
NETMASK=255.255.255.0
GATEWAY=192.168.1.1
DNS1=8.8.8.8
Change network settings as per your own network requirements. Save the file & restart network services.
$ systemctl restart network
Now let's create our first virtual machine.
Creating a Virtual Machine
We will launch ‘virt-manager’ to create our first virtual machine. You can launch viet-manager either using CLI or graphically,
For CLI, launch your terminal & type
$ virt-manager
Or Virtual machine manager in you Application under system tools. Once it has been launched, goto 'File' & click on 'New Virtual Machine'

We will be using an ISO image for our installation, so select 'Local Install Media' for installing OS,

next , select the location for your ISO image & click Forward,

on the next page, select 'Memory' & number of 'CPUs' & click Forward,
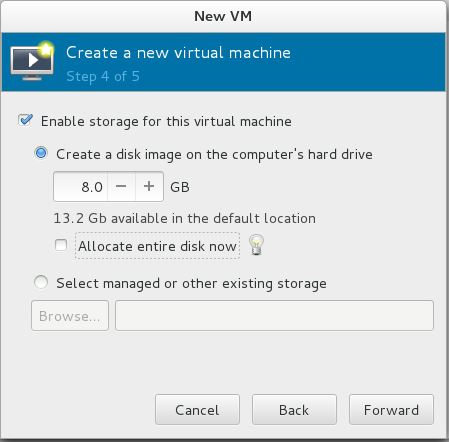
specify the storage size for your VM & click Forward,
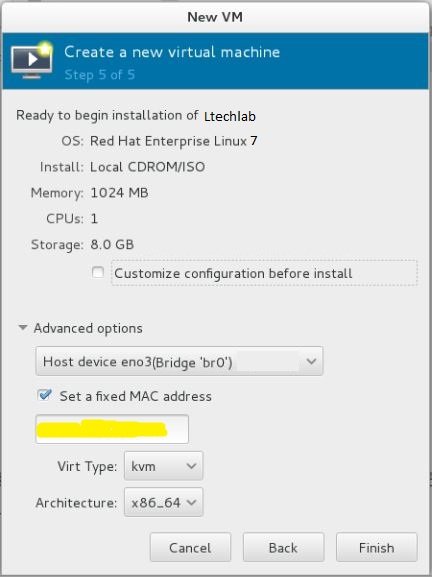
On the next page will be the summary for our VM, review all the configurations & in Network selection , select bridged adapter 'br0' & hit finish. Now install the OS as you normally do & boot into VM once the installation has been completed. Similarly create as many VMs as you need & as your resources permit.
This concludes our tutorial for installing KVM on CentOS. if you are having any issues or have any suggestions, please feel free to submit them through comment box down below.
If you think we have helped you or just want to support us, please consider these :-
Connect to us: Facebook | Twitter | Google Plus
Become a Supporter - Donate us some of you hard earned money: [paypal-donation]
Linux TechLab is thankful for your continued support.