
Here we are going to discuss how you can create a WordPress Website for free. So if you are interested in creating a free WordPress Website to test out WordPress before you commit to permanent yearly hosting plans or want a staging or test website, etc, then read the complete article.
How are we going to do that?
We will be using DigitalOcean for this. DigitalOcean is giving 100$ for anyone to use any of their services. So not only can you create a WordPress website for free. Not only can you use it to host your site but you can also host any other service or application as well for almost free.
Now let’s discuss the step-by-step process to create a WordPress Website for free with DigitalOcean.
What is Digitalocean?
DigitalOcean is a Cloud Computing vendor that provides the Infrastructure as a Service (IaaS). It’s similar to how AWS or Azure operates. They will provide you servers etc with pay as you go, model, & you are only required to manage the servers & not have to worry about other external infrastructure, etc.
Get complete details about DigitalOcean here.
Recommended Read: Hostgator Hosting Review: Is Hostgator Good ?
Also Read: 10 Best VPN services you can use in 2021
How to create a free WordPress Website?
Following steps are involved in creating your WordPress website for free,
Step 1- Create a free DigitalOcean account (get 100$)
Step 2- Create a new Project
Step 3- Create a new server or Droplets for WordPress
Step 4- Configuring the WordPress Website
Step 5- Accessing the Website
Now, let’s discuss these steps in detail.
Step 1- Create a free DigitalOcean account to get 100$
When you sign up DigitalOcean using the link here, you will get 100$ that you can use to create a server or test out various DigitalOcean services available. Though there is one catch, in order to get the 100$ deposited to your DigitalOcean account, you need to add at least 5$ first. But still, with 5$, it’s a pretty sweet deal.
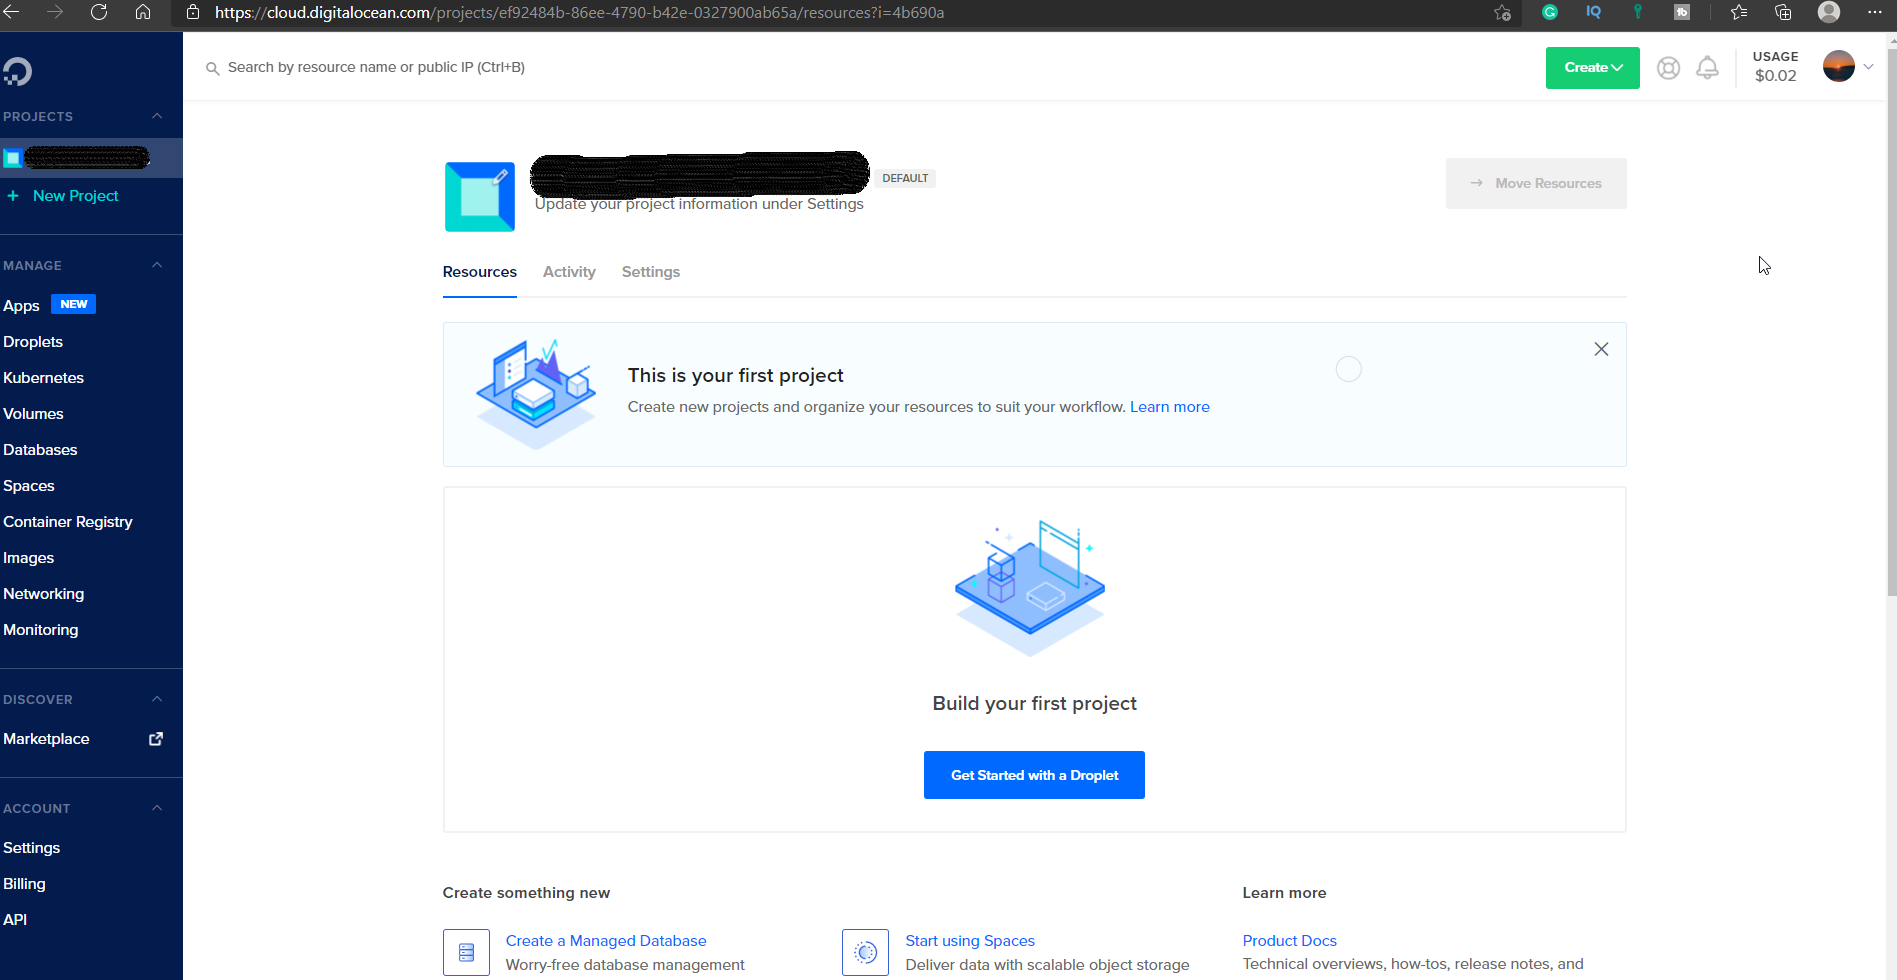
Once you have signed up, you can then see the following dashboard for your account on DigitalOcean.
Step 2- Create a new project
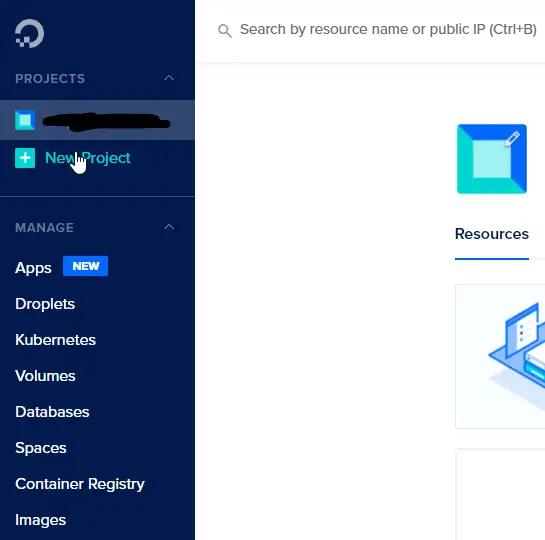
Now, this step is actually kind of optional, but still, I would recommend that you create a new project so that it is easy to identify your servers or workloads.
To create a new project, check the left-hand side of your DashBoard, there you should see ‘New Project’. Click on it,
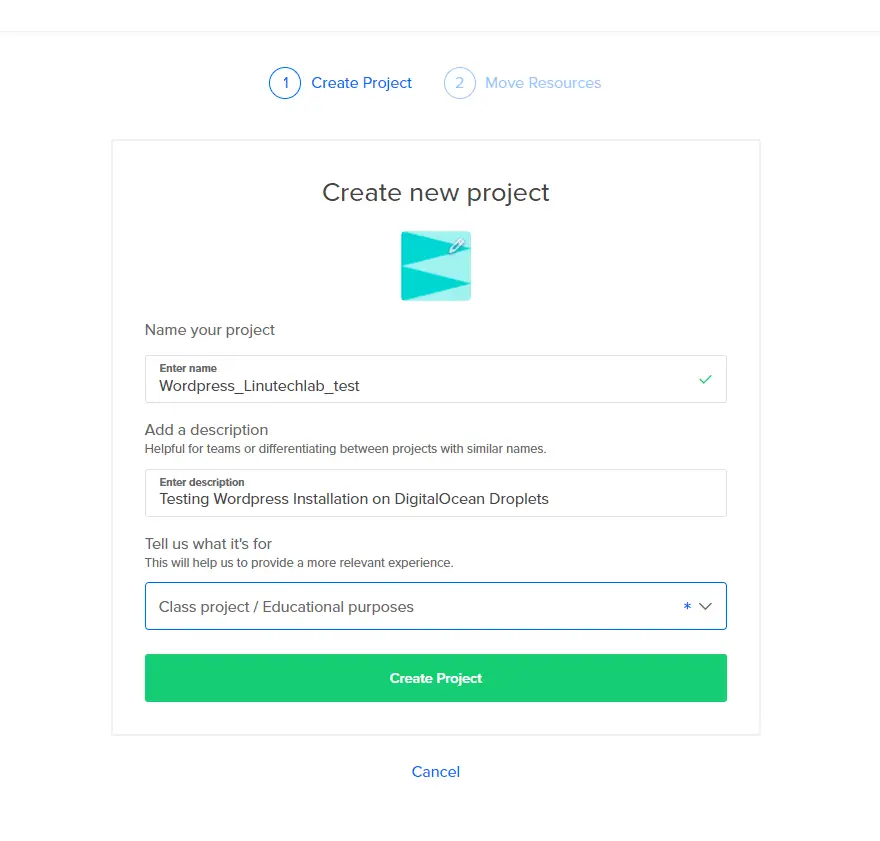
Next, you would be asked to enter details for the new project, enter those & click on ‘Create Project’.
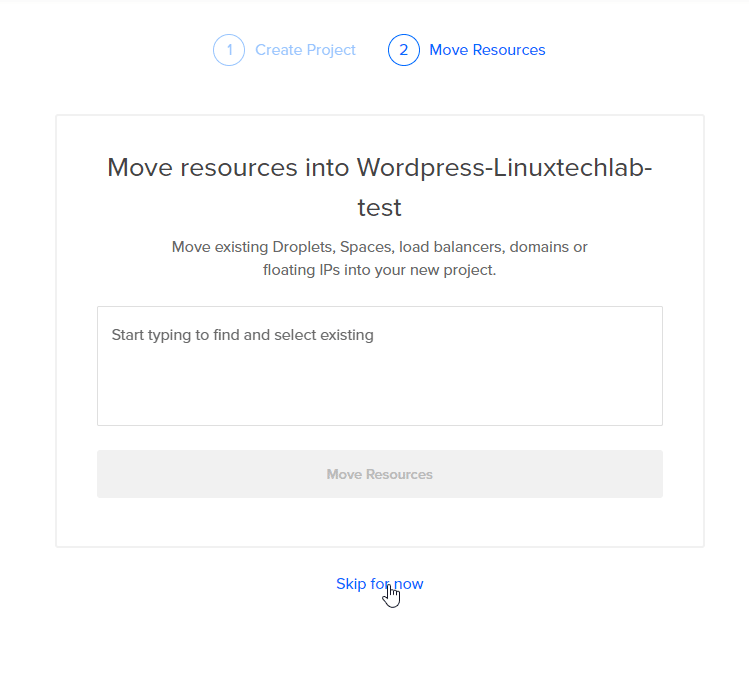
On the next screen, you would be asked to move any existing resources to this new project. Since we don’t have any, click on ‘Skip for now’,
Your new project has been successfully created.
Step 3- Create a new server or Droplets for WordPress
The next step is to create a server for your WordPress installation. Servers in DigitalOcean are referred to as Droplets, so we would be creating a new Droplet.
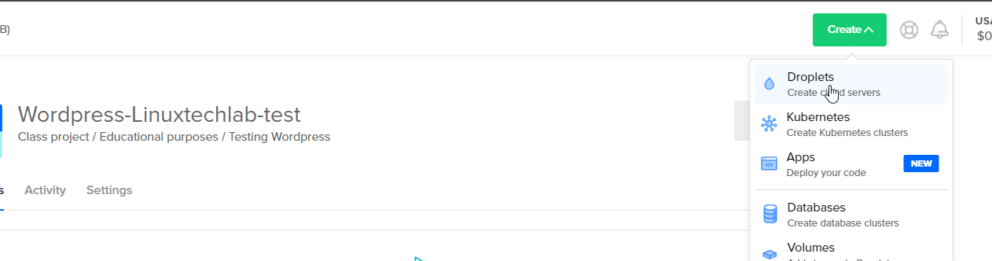
To create one, check the Top Right corner of your Dashboard, you should see the option ‘Create’, hover the cursor over it & it will expand the menu. From the menu, select ‘Droplets’,
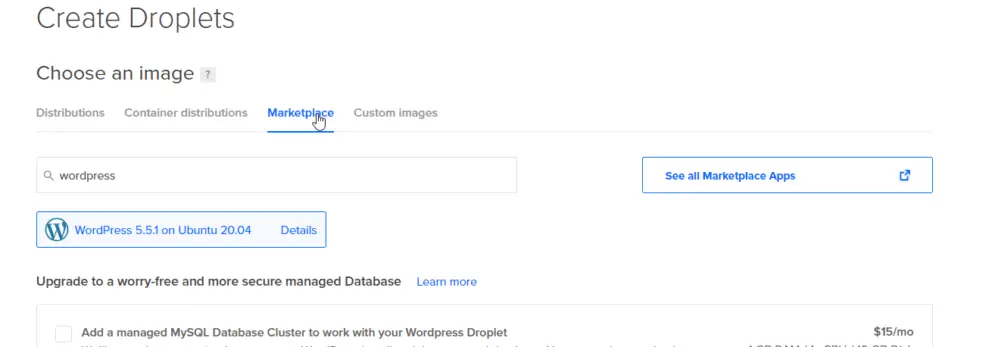
Now, on the next screen, Click on ‘Marketplace’ & in the search bar, type ‘wordpress’. In the result, you should see ‘Wordpress 5.5.1 on Ubuntu 20.04’ or something like that with a different WordPress version or OS version. This is actually a pre-installed image of Ubuntu 20.04 that has WordPress already installed on it, so we have our work cut out for us.
Select the image,
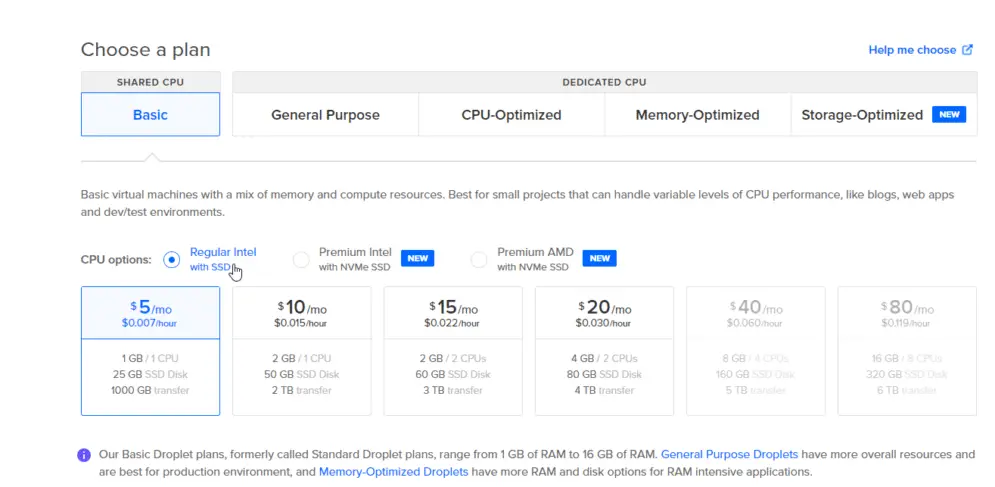
Once you have selected the image, scroll down a bit & you will see the option to select your server configuration. I will be selecting the cheapest one since this is only a test site but you can see other server types as well,
Next, move a bit further & select the region where you would like to launch your server,

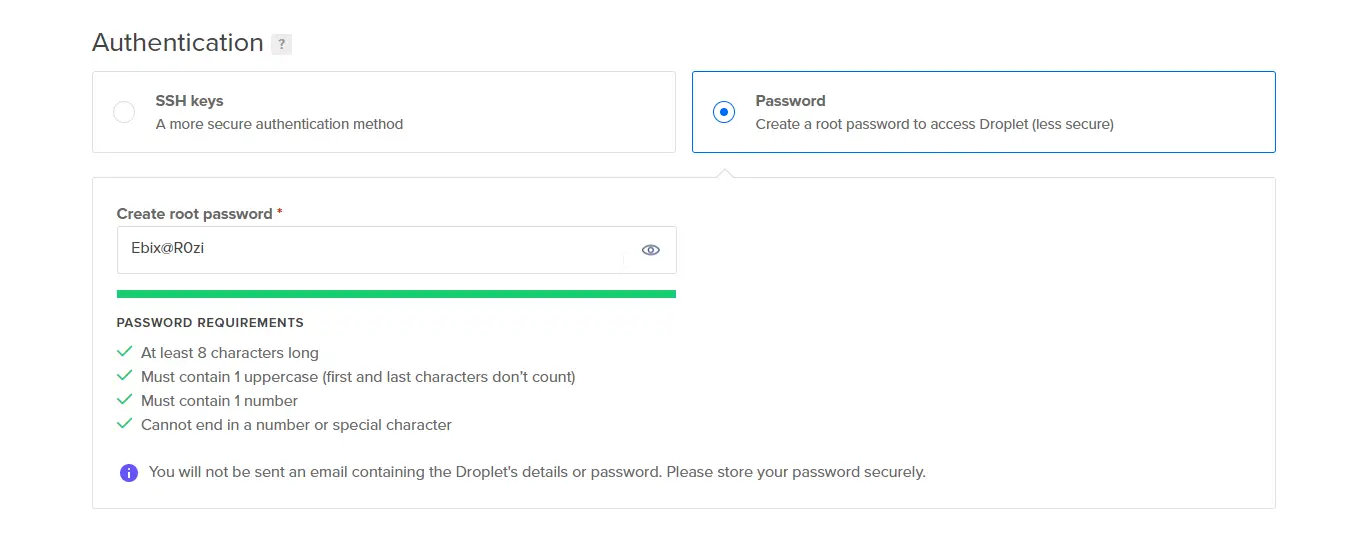
Scroll down a bit further & you will see the ‘Authentication’, here you can either choose ‘SSH keys’ or ‘Password’ based authentication to access your servers. From the security point of view, ‘SSH keys’ are best but ‘Password’ is also fine as long as you choose a strong password,
Scroll down a bit more & you will be asked to select the number of Droplets that you want to launch with current configurations, we only need one WordPress site so we have selected ‘1 Droplet’ & then you also need to mention the hostname for the server here.
Also, you can add tags to organize &/or identify the server & select the project under which you need to launch the server,
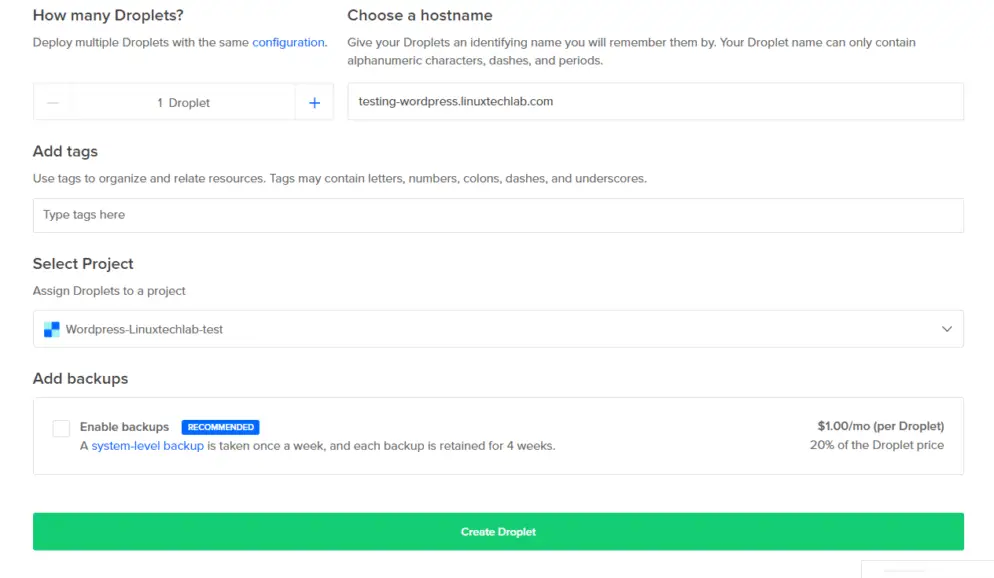
Once you have selected the necessary options, you can now click on ‘Create Droplet’. After which you will be redirected to your Dashboard, where you can see the server running,
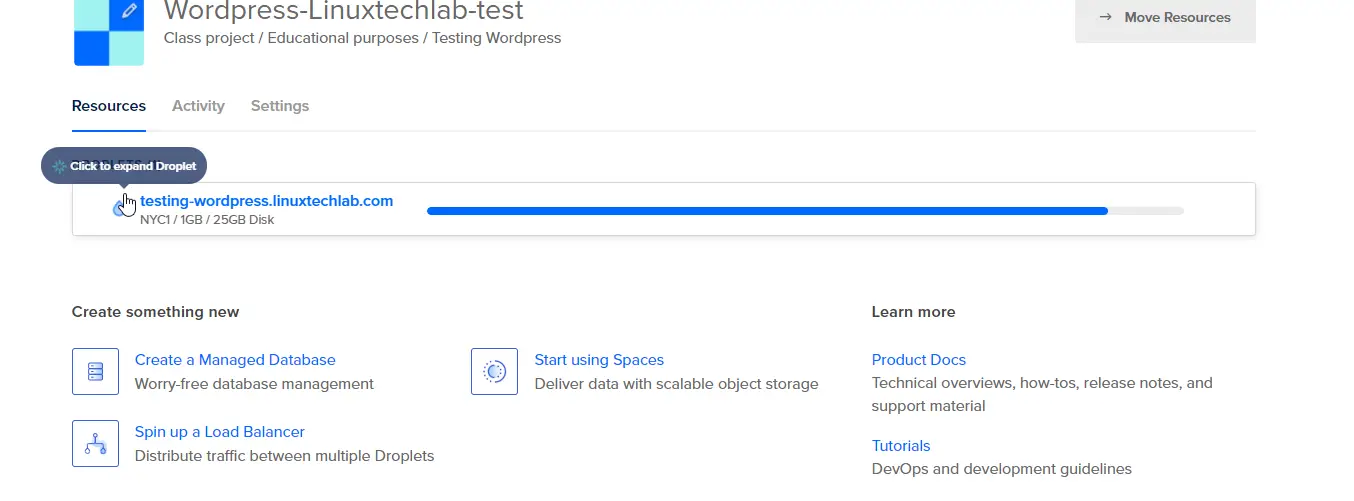
You can click on the server as shown above to get the complete details of that droplet.
Step 4- Configuring the WordPress Website
Note:- Before you proceed with this step, you need to create a DNS record for your website URL to point to this server IP. You can do this by logging into your DNS management provider (usually the vendor like Namecheap or Godaddy, from where you have purchased the domain name). If you don’t have a domain name, you can simply access the website with the server IP address but you won’t be able to install an SSL certificate.
Now to configure our WordPress website, we need to login into our server. For that, you can use your terminal, if using Linux or MAC or you can use PUTTY if using a Windows machine. BTW we also have a tutorial on how to install Linux on a Windows 10 machine (New way to Dual Boot Ubuntu with Windows 10 - LinuxTechLab), read that if you want to install Linux & use its terminal on Windows 10.
Now open your terminal or putty & connect to the server by entering its username, password & IP address. As soon you are connected, you should see the following pop-up,
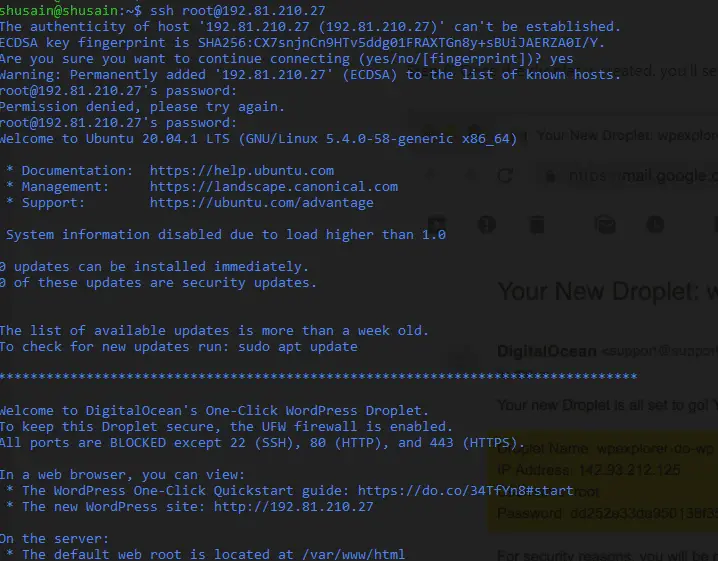
It’s showing your website URL, which in my case was http://192.81.210.27 (don’t bother accessing, it has been deleted) & it will also show some other information about your WordPress site. Recommend you all to give it a read.
Next, when you scroll down further, you should see the following,
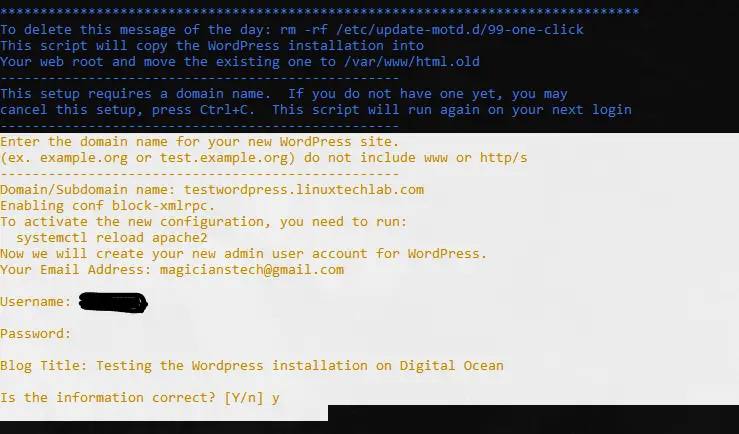
Here, you are required to enter your website URL, admin user name for the WordPress site & its password, and also your Blog Title, Enter all this information & verify it by typing ‘Y’.
Next, you would be asked if you want to configure the SSL certificate for your website as well. This SSL certificate is created using Let’s Encrypt & is completely free. Also, this would not work for you, if you have not created the DNS entry for your website to point to this server.
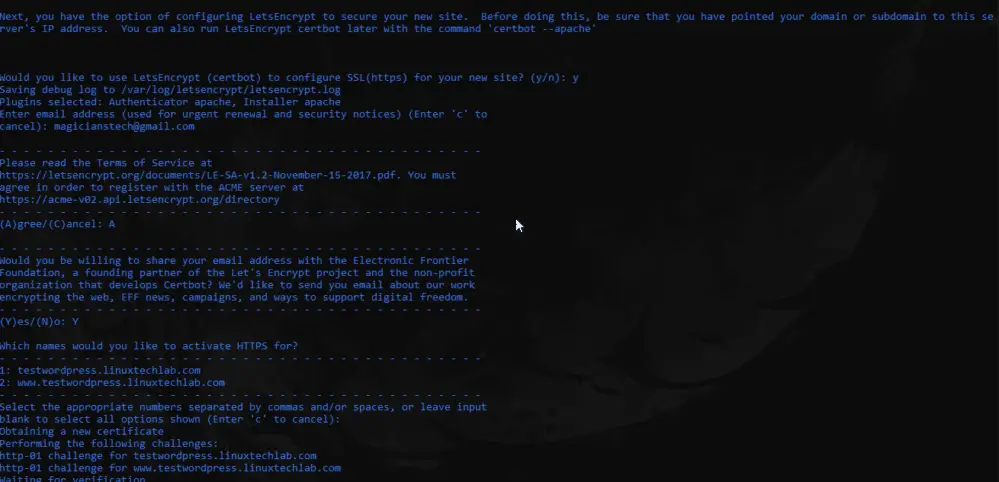
Just follow the on-screen instructions to install & configure an SSL certificate for your website. Once this is complete, you should see that your WordPress installation has been complete,
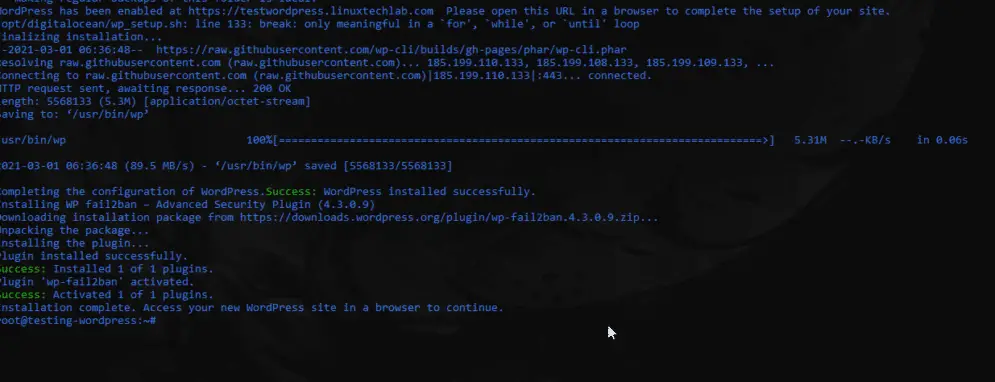
Now it’s all good, your website is now ready. You can now disconnect the SSH connection to the server.
Step 5- Accessing the Website
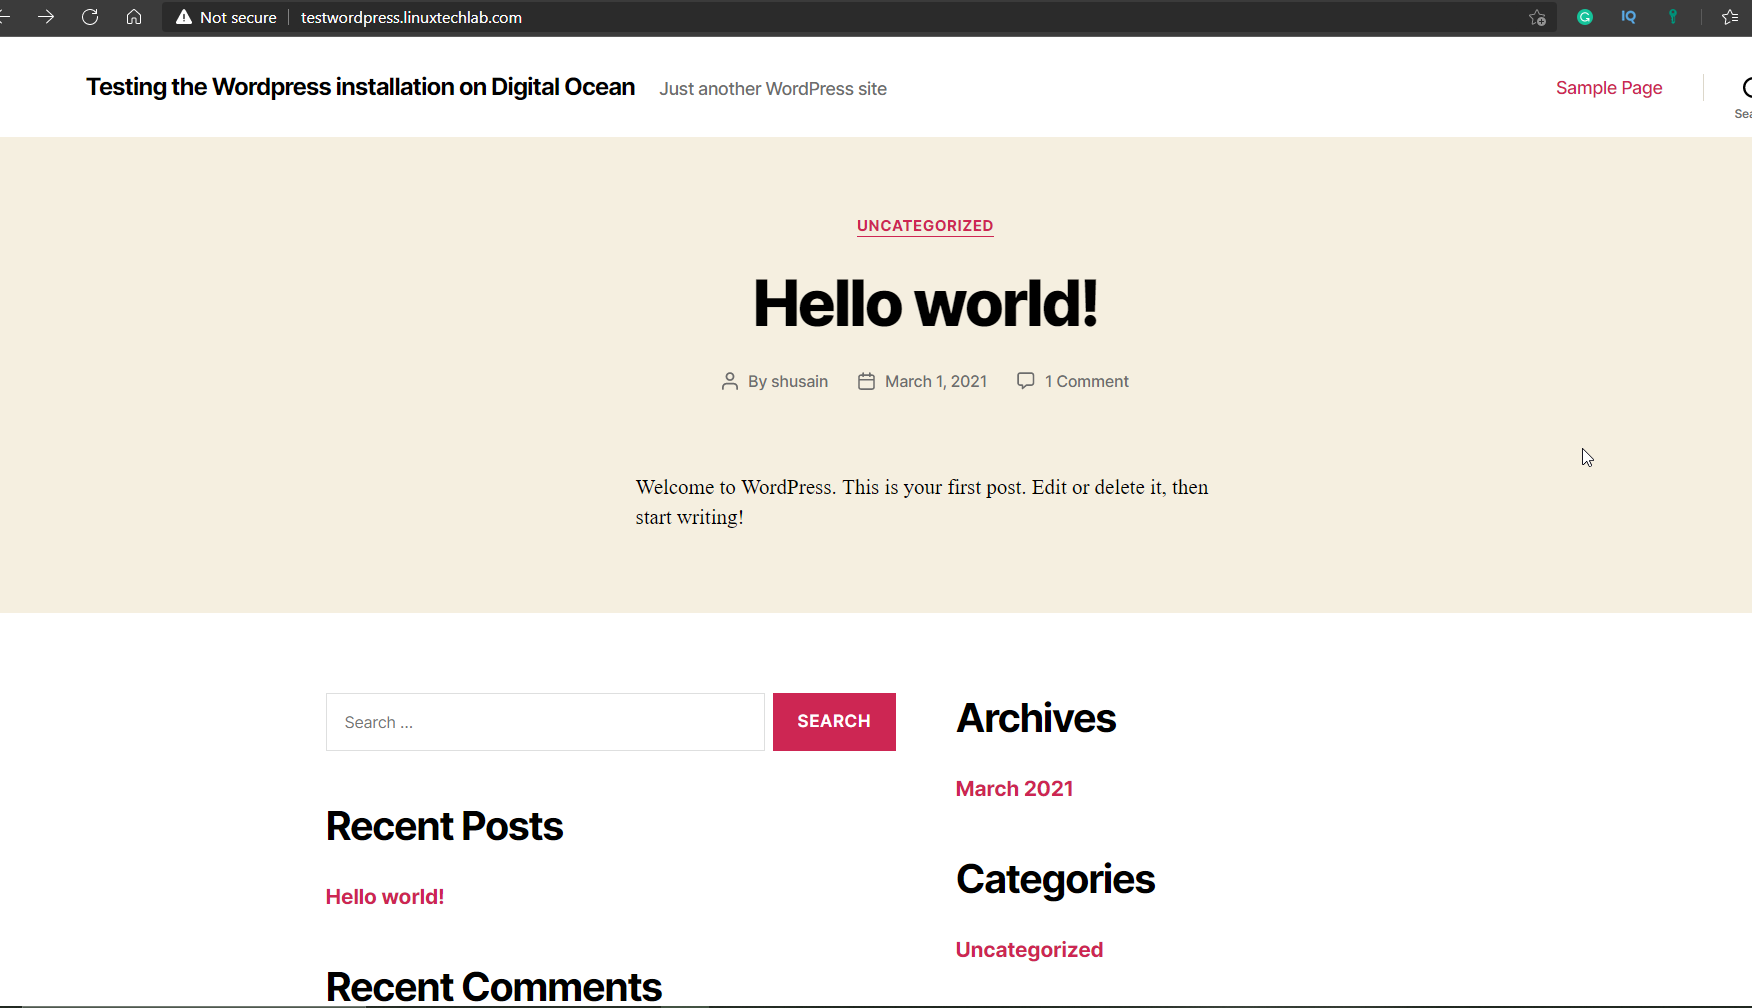
You can now open your browser & can now access your website by entering the URL or IP address of the Droplet server,
Also to access the admin panel of the WordPress Website, type your website URL followed by /wp-admin. You will then be asked to enter the username & password, which you created when accessed the server.
Enter the details & you should then be redirected to your Admin dashboard,
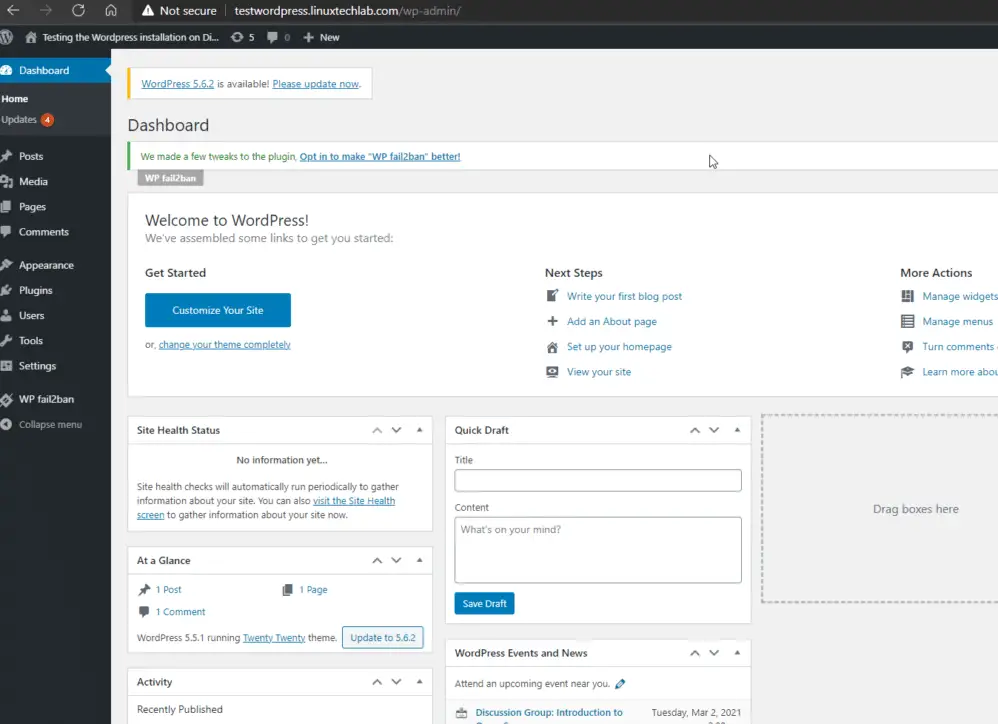
You can now customize your website, install a new theme, install a plugin or just publish your content.
After testing your website, if you are interested in creating your WordPress website permanently, you can continue to use the DigitalOcean Droplet, or if you don’t want to manage a server or don’t have the necessary skills to do so, might we suggest that you use a good hosting company.
| Hosting Provider | URL |
|---|---|
| Hostinger | |
 | Hostgator |
| BlueHost | |
 | Inmotion Hosting |
With a website hosting company, you won’t have to manage the servers & only need to manage your website. You can choose any of the following Hosting Providers mentioned below,
Also have a look at the following article (Step by step guide to creata a WordPress Website), if you want to create a WordPress website with Hosting Provider.
So this completes our tutorial on how to create a free WordPress Website. Please do let us know if you have any questions, queries, or suggestions.
We are giving you exclusive deals to try Linux Servers for free with 100$ credit, check these links to claim your 100$,
DigitalOcean - 100$ free credit & Linode - 100$ free credit
Check some Exclusive Deals, HERE.
Also, check out DevOps Book You should read section.