
Well, this is not exactly a new way & its not exactly dual booting. It has been there for around 3 years now but i am surprised how a large percentage of Windows 10 & Linux enthusiasts don’t know about it & still use the old way to dual boot Linux & Windows (Read one of our tutorial for that HERE), which, in my opinion gets broken all the time.
Thanks Microsoft for their seamless Windows updates (pun intended !!!).
Recommended Read: Learn to create Bootable Linux Flash Drive (using Ubuntu)
Also Read: How to Add and Remove Users in Ubuntu
So with this new, we run Windows 10 like we normally do & we can use the Ubuntu ( or many other Linux distributions available on Windows store) like any other application installed on Windows 10. So what do we get with this new dual boot Ubuntu with Windows 10 ??
We get :-
-- All important commands from Linux to run on Windows 10 like, ssh, scp, rsync, vim, apt etc
-- All the packages available for Linux to install, which are not available for Windows 10.
-- & our reliable and great community of Linux users.
This is a great way for any beginner or even an expert user to learn & work on Linux, we get the best of both worlds.
So how exactly would this work ???
In this tutorial, we will learn to install & user dual boot Ubuntu with Windows 10.
Pre-requisites
Well the only thing you need is a Windows 10 update from October, 2017 called Windows 10 Fall Creators update.
Dual Boot Ubuntu with Windows 10
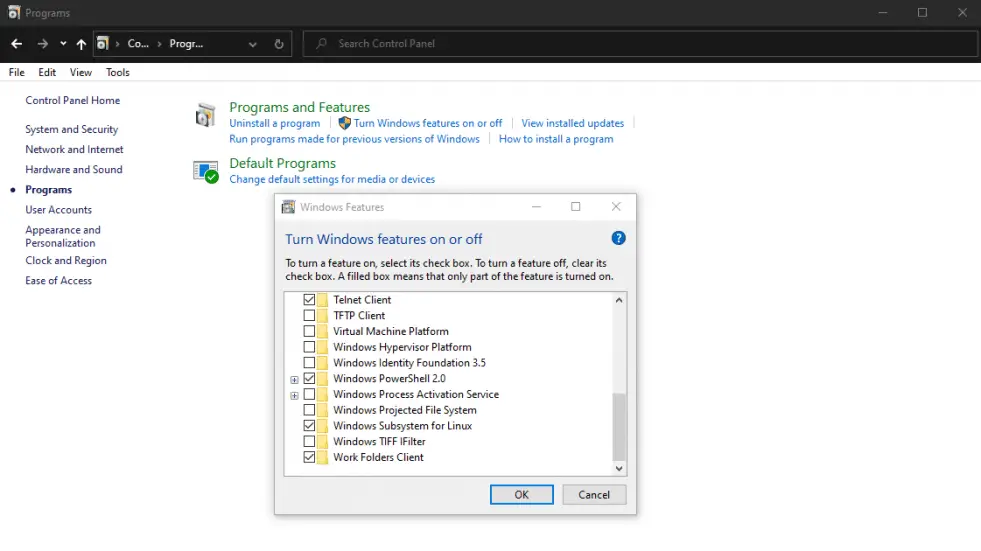
To make Ubuntu work with Windows 10, we need to first enable “Windows Subsystem For Linux”. Goto ‘Control Panel’, then click on ‘Programs’.
Under ‘Program & Features’ you will find ‘Turn Windows features on & off’. Now go all the way down to bottom, it's the bottom 3rd option ‘Windows Subsystem for Linux’. Check that box, click Ok & then we need to restart the system.
There is another way to enable this, using PowerShell. So with the newest May, 2020 Windows 10 update, we can use WSL-2. Open powershell & execute the following command,
$ dism.exe /online /enable-feature /featurename:VirtualMachinePlatform /all /norestart
& if you have not updated the system with latest updates, then you can enable WS-1 with the following command in powershell,
$ dism.exe /online /enable-feature /featurename:Microsoft-Windows-Subsystem-Linux /all /norestart
Now we have to restart the system to implement the changes.
Next step is simple, all we have to do is to open the Microsoft store & in search bar, type Ubuntu,

The first three Ubuntu shown here are maintained by Canonical itself, so recommend you to use any of those but there are others as well that you can use. Click on any of these & then click on install in the next screen.
Download of these is about 450 mb, once it's completed, you can then open your start menu & search for Ubuntu. Once it’s opened, you will have to wait for about 5 minutes as it will complete the installation.
Once that’s done you can then use Ubuntu, we have a terminal ready to use. That’s it guys, this is how to dual boot Ubuntu with Windows 10.